I haven’t got a lot of knowledge about this holiday but one thing I know is that I love pumpkins. Round ones, skinny ones, ghost and grey ones, huge and small. You name it I have probably seen it all.
As long as they are organic I will always have an idea to make something amazing. Sweet or savory, main or a treat they are very versatile.
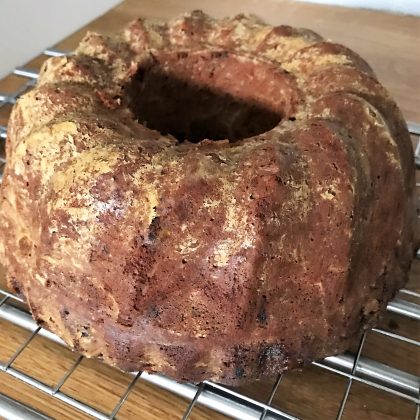
Pumpkins are not only delicious but also they are very good for you. Pumpkins contain loads of vitamin C & A, potassium, zinc, are high in antioxidants and fiber. Sadly we don’t appreciate this amazing fruit enough in the UK. To start you slowly if you are not familiar with it give a try and make this super tasty Pumpkin Sponge.
Not just ordinary sponge. It’s Pumpkin Sponge.
My Pumpkin Sponge is not too sweet, velvety and moist. Can be eaten on its own as we found out pretty much straight away .
But if you have more patience than us you can top Pumpkin Sponge with many different creams. Sadly I haven’t had a chance to make any toppings because the minute I took Pumpkin Sponge out the oven it was almost gone.
The next time I make Pumpkin Sponge I will top it with vanilla whipped cream or simple cream cheese frosting. I think this would be the perfect combination for it’sdelicious and delicate taste to compliment the pumpkin and aromatic aftertaste of the spices.
Ideally you can just cover the top, sandwich it or even stack a few layers deep together. That is only if you can wait that long.
Method.
Turn on your oven to 155C fan, 165-170C without fan.
Prepare 8″ or 9″ round tin depending how would you prefer to present it. I wanted this to be a little bit flatter as I was planning on one layer of cream and baked it in 9″ pan.
Grease the tin and line with baking paper. Set aside.
Prepare all the ingredients.
Melt in a cooking pan on a low heat stirring regularly:
250g mascarpone
250g white chocolate
450g pumpkin puree (you can use canned or make your own – recipe to follow soon)
400g sugar
Wet ingredients for Pumpkin Sponge
Sieve all the dry ingredients in a separate bowl and stir evenly.
150g self raising flour
150g plain flour
1 tsp baking powder
1/2 tsp bicarbonate soda
1 tsp cinnamon
1/8 tsp nutmeg
1/4 – 1/2 tsp powder ginger depending on your taste
Check the cooking pan and if all the ingredients are combined and melted add a
dash of vanilla and
half of the dry ingredients.
Gently mix together Pumpkin Sponge. Be careful don’t stir to vigorously or for too long as you don’t want to knock any air bubbles out.
Add the other half of dry ingredients, stir gently again and pour in the tin.
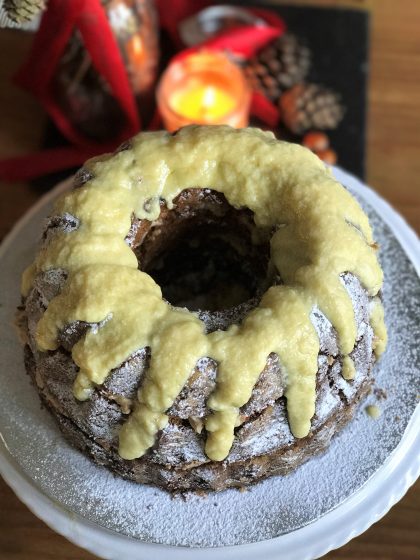
Woke up this morning to an amazing white scene outside and started craving a slice of Christmas mincemeat sponge.
I love snow, probably as much as I love cake. Especially because it reminds me of cold, snowy, Christmassy mornings when I was a kid. Every time when we had fresh snow, and usually in Poland snow was quite deep, we would go sledging. I was one of those lucky kids living next to a hill. In summer we called it Green Hill but obviously in winter it metamorphose into the best sledging course. Thinking about it now it was actually quite scary and super fast course about 150 metres long. Playing with all the kids racing we would spend there almost a whole day coming back knackered and hungry.
As soon we came home we either would have dinner or in most cases hot chocolate and slice of cake!
And because is almost Chrimas this was a perfect excuse to bake Christmas mincemeat sponge.
Some might ask what mincemeat is?
I have never heard of mincemeat before coming to England. Apart from that one time when Rachel from Friends wanted to make British Christmas trifle-pie. Everyone remember this episode, right?
In the UK everyone knows what mincemeat is and all the stores sells at least a few different types. Mincemeat despite the name is a sweet mix of dried fruit soaked in alcohol. Mainly used in Christmas bakes like Mince pies but this time I have used it in Christmas mincemeat sponge recipe.
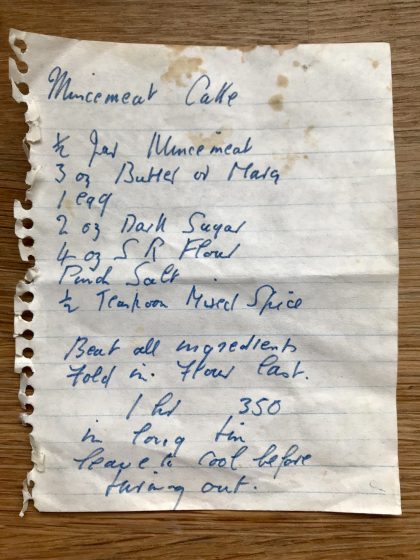
This particular recipe is probably more than 30 years old and belonged to Zara’s great grandma… or possibly ever her great great grandma. I found it in her little recipe box and one day decided to give it a go.
We love great grandmas Christmas mincemeat sponge so much we make it during the year as well as for Christmas.
Christmas mincemeat sponge is a quick, easy and very tasty treat even for those who have a limited baking repertoire.
What does it taste like?
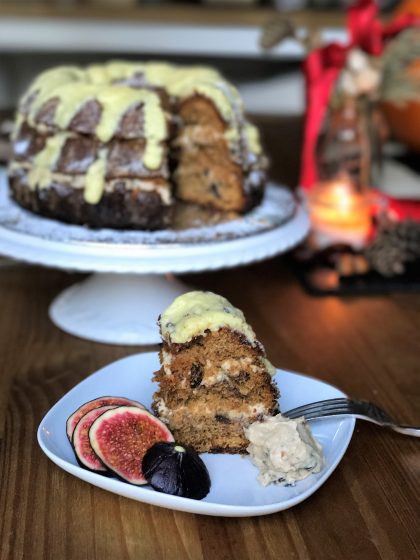
The Christmas mincemeat sponge is not too sweet, bit tangy with characteristic mincemeat flavour. Light and delicious. With little bursts of juicy fruit surrounded by rich and moist sponge. So unlike the traditional Christmas cake which can be quite heave and stogy with strong aftertaste.
You can eat it plain…
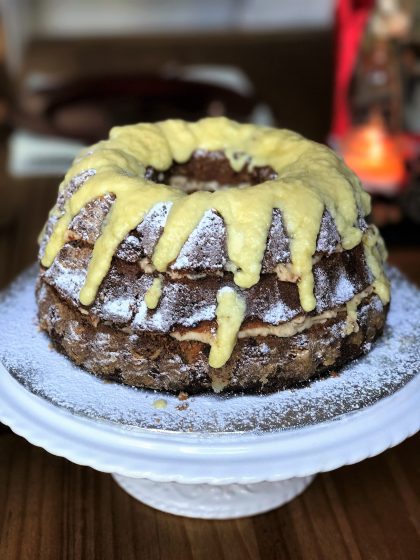
…or filled with Mincemeat cream cheese frosting (recipe to follow) and drizzled with white chocolate sauce to make it more festive.
Method.
You will need greased and flour small round cake tin 7 – 8″ or a pretty bundt tin. Set your oven to 175C, fan 160C.
Place in a mixer bowl:
170g of butter or vegetable oil spread
2 eggs
110g soft dark sugar
Beat until well combined.
Add:
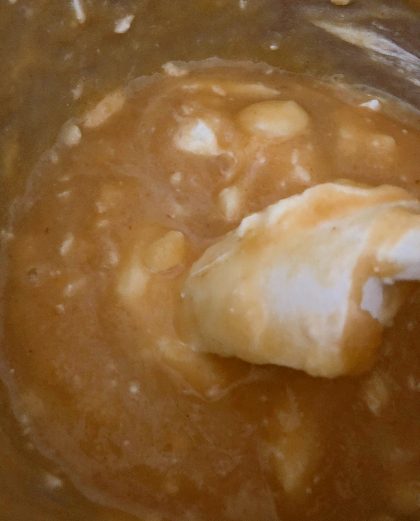
1 jar of mince meat (around 400-450g)
Mix on slow to medium speed for couple of minutes but be careful not to overmix. Sieve and carefully fold in:
225g self raising flour
pinch of salt
1/2 tsp mixed spice
1/2 tsp cinnamon
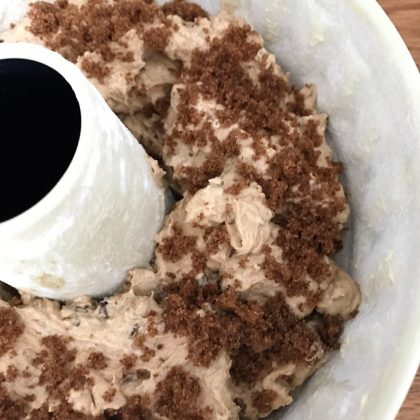
Scoop the mixture into the tin and sprinkle with some extra soft brown sugar if you wish for a nice crusty finish.
Place in the oven and bake until brown, approximately 50 minutes to 1 hour.
When ready remove from the tin. You can eat it warm.
If you decide to layer your Christmas mincemeat sponge with cream first let it completely cool down.
Enjoy with freshly sliced fruit as a dessert or Christmas afternoon cup of tea.
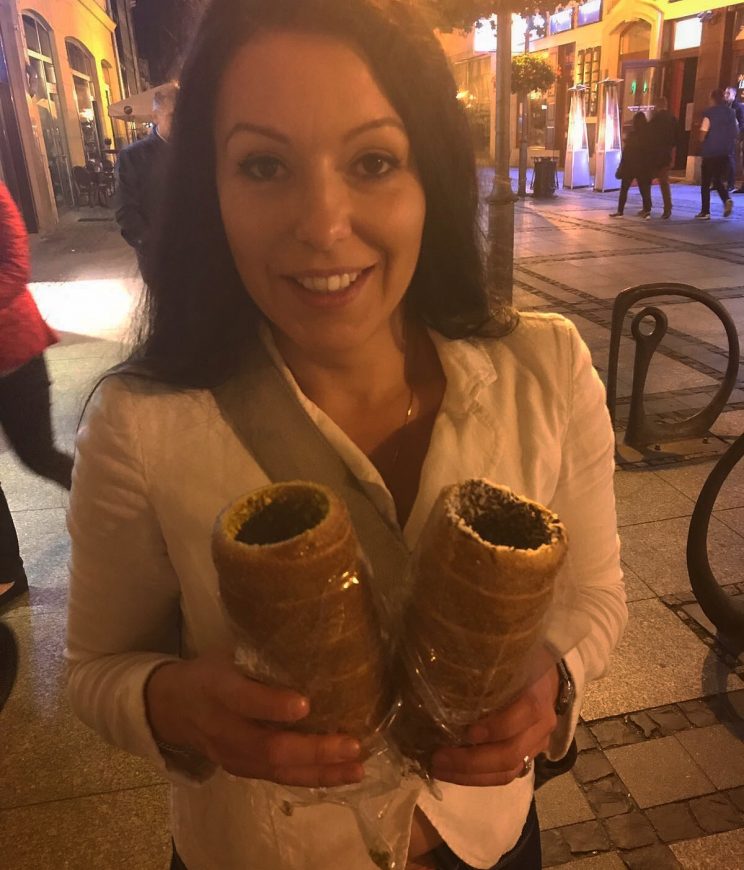
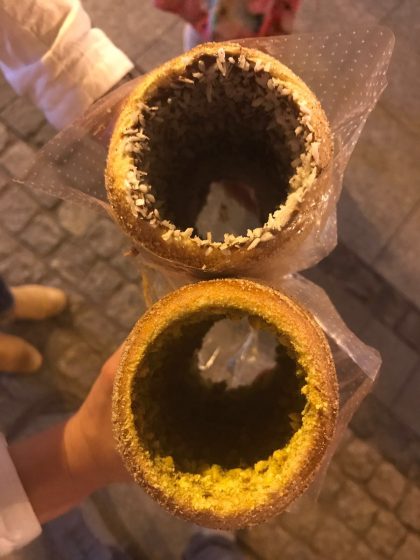
Strap yourself in, today we have an interesting one, Chimney cakes.
Chimney cakes are like a perfect marriage between churros and a warm fluffy doughnut. Ideally with a little scatter of cinnamon sugar. Filled or empty, with or without nuts and sprinkles, literally you can eat it how you please.
We tried making the Chimney cakes for the first time ever a couple of days ago. We really liked the outcome and the idea so decided to share the recipe with you.
How did we come up with Chimney cakes you might ask?
Recently we went for a road trip around Europe. We were lucky to visit some beautiful and interesting places and a few with a nostalgic warmth.
One of the places we visited was Wrocław* in Poland (*read Vrotswav).
When I was younger I spent several years living and studying there. And as I haven’t been back there for a 10 or so years I decided to stop for a few days.
While walking and admiring old haunts our attention straight away was caught by every single cake shop. In some of them we even had double helpings or bought something to take away to munch later. This time while walking through Old Town and Market Square we could smell an interesting sweet mixture and got intrigued.
A little hidden away shop front with a massive queue outside so decided to have a nose around. This later happen to be a Chimney cakes shop which was one of our favourite treats on this trip. There were so tasty we needed to recreate them as soon as possible. There was no way we could wait any longer to have another bite.
Originated from Transylvania.
Chimney cakes originally came from Hungarian-speaking part of Transylvania, Romania. They are also known within the culinary heritages of other European countries like Hungary, the Czech Republic and Austria.
Chimney cakes are made from rolled sweet yeast dough. The dough traditionally is wrapped around a special wooden rolling pins and baked constantly turn over a grill. Chimney cakes are then topped with sugar and all sorts of things.
The name comes from the effect that Chimney cakes create when taken off the baking pins after baking. When they are very hot they steam from the middle, soft part of the bake that looks like a smoking chimney.
But don’t worry I have managed to adapt it for everyone to try it at home without a fancy ovens and wooden pins.
Why should you make it?
I shouldn’t really have to convince you to make Chimney cakes as they are simply amazing. Maybe a little bit time consuming as all yeast dough bakes but otherwise I would eat it warm every day.
Chimney cakes taste divine. Soft, fluffy and not too sweet. You can eat the Chimney cakes creamed inside with almost anything you can come up with. From some soft fudge, chocolate or caramel, jam or marmalade, fresh cream or even topped with ice cream. Often paired with crushed peanuts, pistachios or almonds.
Method.
This recipe will make approximately 12 chimneys.
To make Chimney cakes you will need:
520g plain flour
25g fresh yeast*
90g icing or confectionery sugar
200ml warm milk
If you are using fresh yeast make a starter as directed here fresh yeast starter.
*If you are using dry yeast you can convert it here.
For the next step I use my mixer with paddle attachment. You can also work it by hand but the dough will be slightly wet and quite sticky so I prefer to avoid all the mess.
When your starter is ready place it with the remaining ingredients in a mixer bowl.
Add:
2 large organic eggs
1tsp vanilla
pinch of salt
80g melted but cooled unsalted butter
Mix it on a medium to high speed for a few minutes until it becomes stretchy and smooth. Move the dough to a lightly greased bowl and cover with a cloth. Let it rest for one to two hours until at least double in size.
Homemade Chimney cakes baking pins.
In the meantime prepare some Chimney cakes pins. As mentioned earlier Chimney cakes are originally baked on wooden rolling pins that are spinning over a grill or fire. We haven’t got the luxury of the special equipment so I came up with those simple cheat baking pins.
You will be able to use them over and over again if you are careful enough. Don’t worry to much if they get damaged as they are cheap and quick enough to make some fresh each time.
What you will need:
baking paper
tin foil
a few empty kitchen paper towels rolls, ideally 6 – 12 tubes
Roll each tube in tin foil and push the ends inside the tube. Follow this step for each tube and then follow the same with baking paper.
Turn on the oven to 200C, 180C fan.
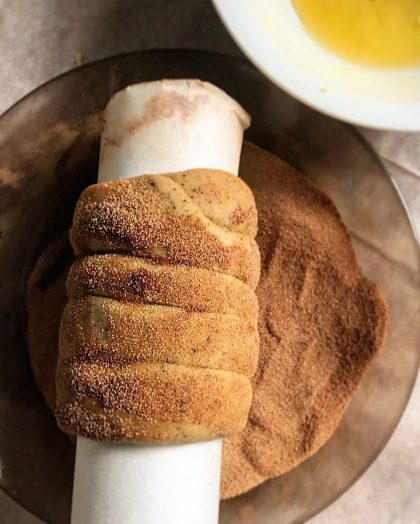
Shaping the dough.
Take the dough for Chimney cakes out and slightly work it again. It will be quite sticky but you can use some plain flower to sprinkle for easie rolling.
Roll the dough quite thin, approximately 1/4″(1cm) and neat rectangular shape around 15″(45cm) long by 12″ (30cm) wide. The tidier the rolling, the easier the next step will be.
Cut it with a pizza cutter to straight, 1″ (2.5cm) wide strips. You should end up with 12 strips. Roll each strip on the mock up baking pins and tuck the ends under the dough.
When you wrap it around the tubes it might have some gaps but that’s ok. Roll it a few times like you would roll a rolling pin. TOP TIP. I push my tubes onto a rolling pin for easier rolling. Make sure there are no gaps in the dough after rolling. Then press and roll it in the cinnamon sugarmixture.
Put it in the oven standing up. I remove all the oven shelves and use my lid rack to keep the tubes in place. Bake for around 12 – 15 minutes or until golden brown but do not overbake. They need to be on a lighter spectrum from the inside.
Standing my Chimney cakes was easier and quicker to turn them around so they bake evenly. If you haven’t got anything to hold them securely you can also use a narrow baking tin ad hang them on long skewers.
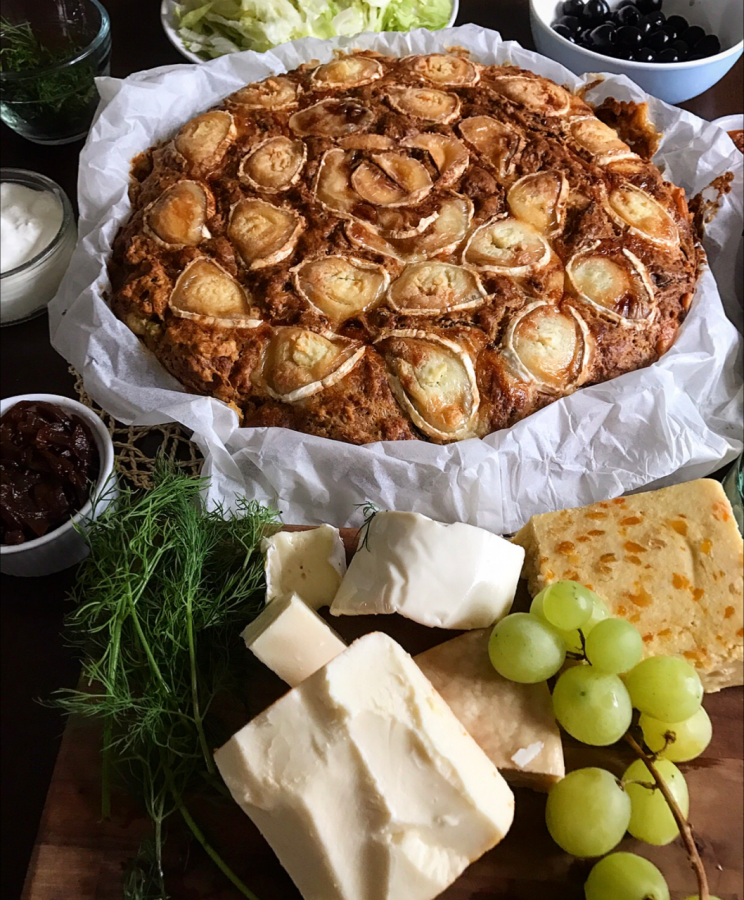
Appreciation of cake, savoury Goat cheese cake in this case
In our house we love cake. We eat it for breakfast, lunch, dinner and we are snacking on cake in between meals… We also love cheese, ideally cheese and olives…
One day I had a brain wave and wanted to make a savoury cake. Can you see where I am going here? {That’s how savoury Goat cheese cake was made.}
You might ask how did I come out with such a mix of ingredients for Goat cheese cake?
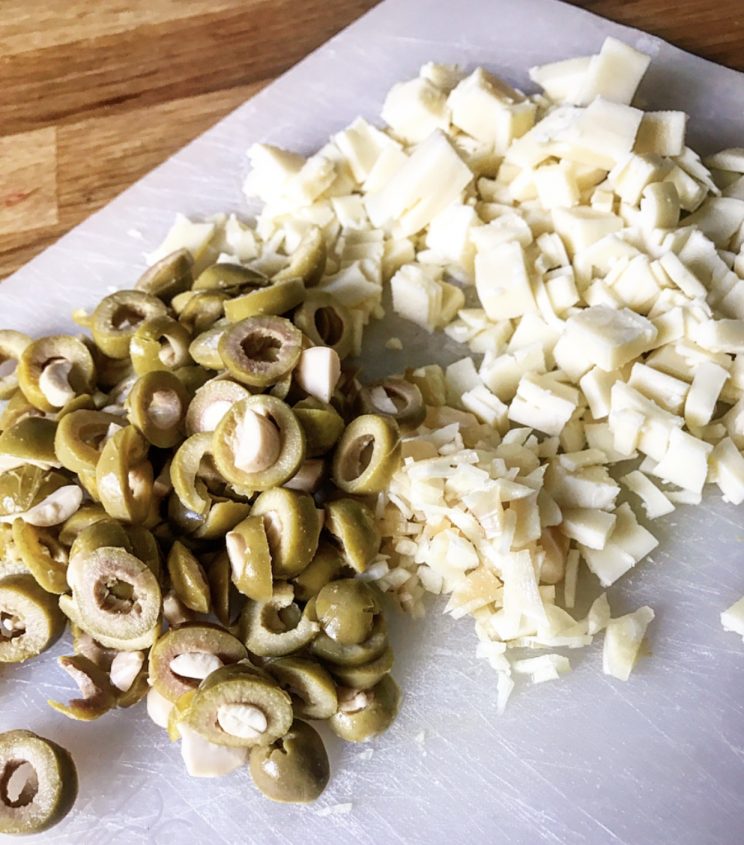
Our fridge is always full of cheese. In the fridge I have spotted a jar of my home-made onion chutney. Immediately decided to pair it with the goat cheese!
Goat cheese and onion chutney were my all-time preferred choices and hot or cold always full of flavour. I have also picked from my pantry some almond stuffed olives for crunch and texture and some red pesto for colour. Goat cheese cake already was a winner.
Why should you bake it?
Goat cheese cake is another one of my easy and quick, almost one bowl recipes where you can’t go wrong. Myself, an experienced cook can make this in one hour but if you never baked you shouldn’t be much behind.
Goat cheese cake is very tasty savoury alternative to a sandwich or a side dish complementing your lunch or dinner. Goat cheese cake is light and moist and perfect to eat it straight from the oven or as a packed snack. It taste almost like a cross of soda bread with a ciabatta except is flavoursome and doesn’t need any fillings.
Method
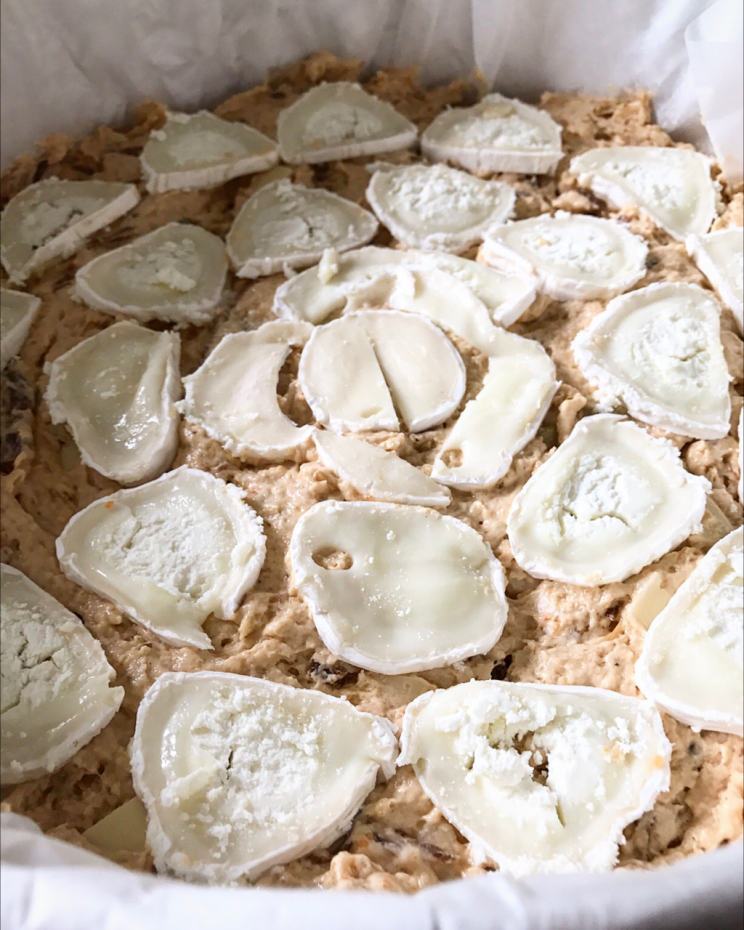
Prepare 10 or 12″ round baking tin. Personally I like Goat cheese cake to be flatter hence bake it in the larger tin.
Line it with tin foil first then with baking paper. This will allow you to get it out easily out the non-spring form without falling apart. Brush the paper with a small amount of olive oil, set aside. Turn the oven to 175C/165C fan.
For the top of Goat cheese cake you will need:
180 – 200g log of good quality goat cheese
Slice it carefully and set it aside.
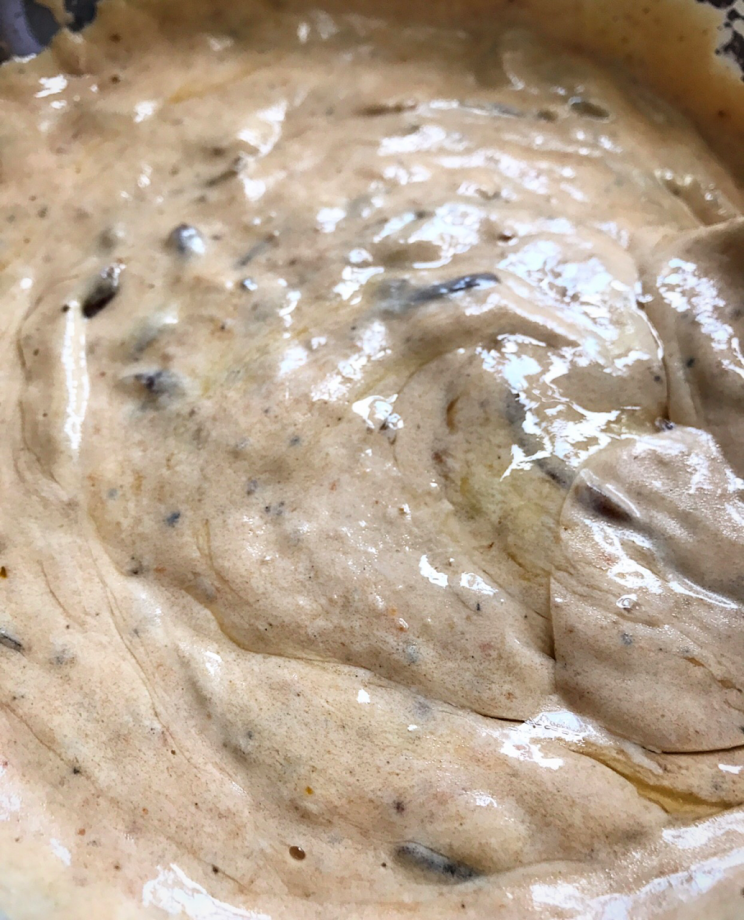
To make mouth-watering Goat cheese cake you will need:
600g of natural or Greek yoghurt at room temperature
130 – 140ml of olive or avocado oil
2 large organic eggs
2 or 3 tbsp. of Maggi (it’s a liquid seasoning, but you can skip if you haven’t got it or replace by 1 – 2 tbsp. of dark soya sauce)
120g of sliced almond stuffed green olives (or 100g olives of your choice with a handful of blanched almonds soaked for couple of hours in boiling water)
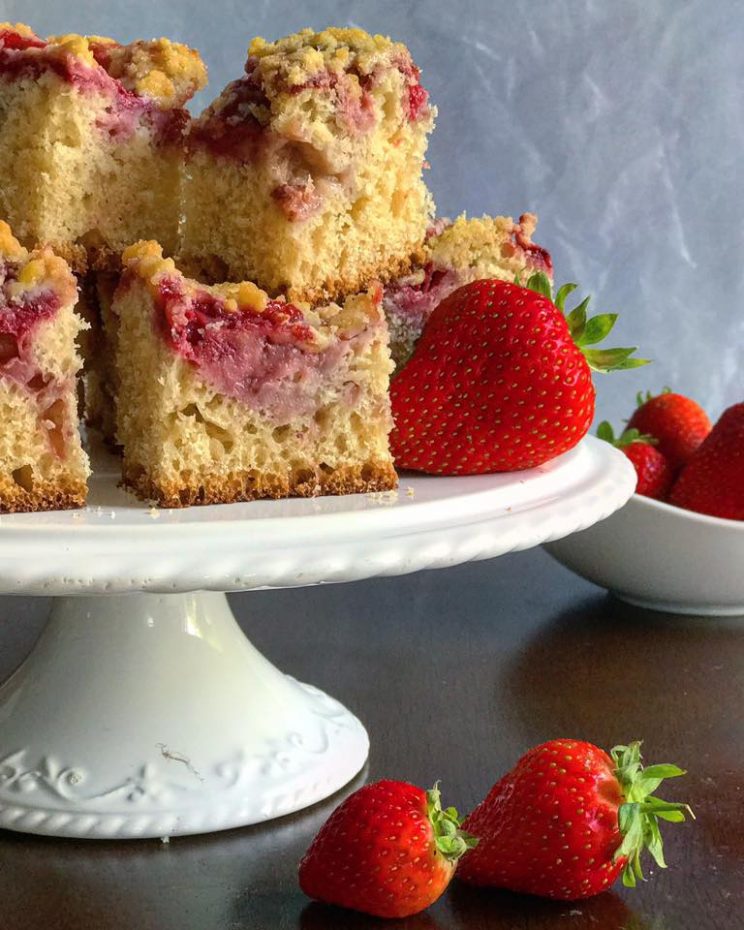
Today we have a special bake Babcias strawberry crumble cake*.
What an amazing hot summer we are having in the UK right now!! First time in years I am actually able to slow down for a little while and admire the surroundings. I have finally managed to expand my beautiful organic allotment and we have picked our first large crop from the strawberry patch. As soon I have picked the first strawberry I knew what I am going to make. My thoughts took me to my late grandma and her amazing Babcias strawberry crumble cake!
My grandma, in polish babcia* who of course had a massive influence on my food journey was an amazing cook. She was always cooking or baking and was always offering food to anyone who walked through the door. Her and granddad (dziadek*) had a massive fruit and vegetable garden where they were growing many organic fruits. She was the master queen of yeast dough and in the summer her signature bake was this simple berry cake. Preferably topped with strawberries or raspberries and it had to be sprinkled with some delicious crumble.
This tasty and delicious Babcias strawberry crumble cake is a must in the current weather. You can have it as light breakfast with a glass of milk or a quick bite with afternoon ice tea. It’s great for a picnic or lunch out as it keeps really well and could be a healthier alternative to a doughnut.
Don’t worry there is no kneading or hard work involved as you normally would expect when working with yeast. The hardest part is watching and waiting for the dough to grow but believe me it’s so worth it!
Babcias strawberry crumble cake can be eaten hot, almost straight from the oven or even cold the next day… but it never lasts that long.
Babcias strawberry crumble cake is flavoursome, light and fluffy almost like the Italian Panettone cake. With fresh, juicy sweet and sour burst of strawberries nicely ‘melting’ in the dough. Coated in sweet, golden, buttery crumble!
Method:
The dough part for Babcias strawberry crumble cake.
You can mix with a large wooden spoon until well combined, approximately 10 – 15 minutes. Alternatively to save time and energy I am using my free standing mixer with beater end. Leave in warm place covered with a cloth till at last double in size. Approximately 45 minutes to an hour. I don’t usually rush this step so sometimes let it stand even slightly longer when I go out or carry with other jobs.
When the Babcias strawberry crumble cake mixture is growing I prepare the strawberries. You will need
800 – 1000 g of strawberries (or if you prefer other red berries)
Wash them, clean and dry thoroughly. If they are a little bit on the sharp side, mix it with a few table spoon of sugar and leave on a sieve to let the juice out.
Crumble part for Babcias strawberry crumble cake.
160g sieved plain flour
110g cold (from the fridge) and chopped unsalted butter
100g sugar
Chop all the ingredients together to crumble like mix and place it in the fridge.
Assembling Babcias strawberry crumble cake.
You will need 10 or 12″ square tin or a equivalent lined with baking paper. After an hour or so of resting the yeast dough mix it briefly again and spread it in a tin. Evenly cover with fruit and levse for another 15 – 30 minutes to rest.
Warm up over to 190C. Sprinkle crumble all over the Babcias strawberry crumble cake and place it in the over for around 45 minutes. Bake to golden on top or check it with a skewer.
Remove from the oven and slice it straight away or leave it to cool.
I hope you will enjoy it as much as we do and will bake it over and over again.
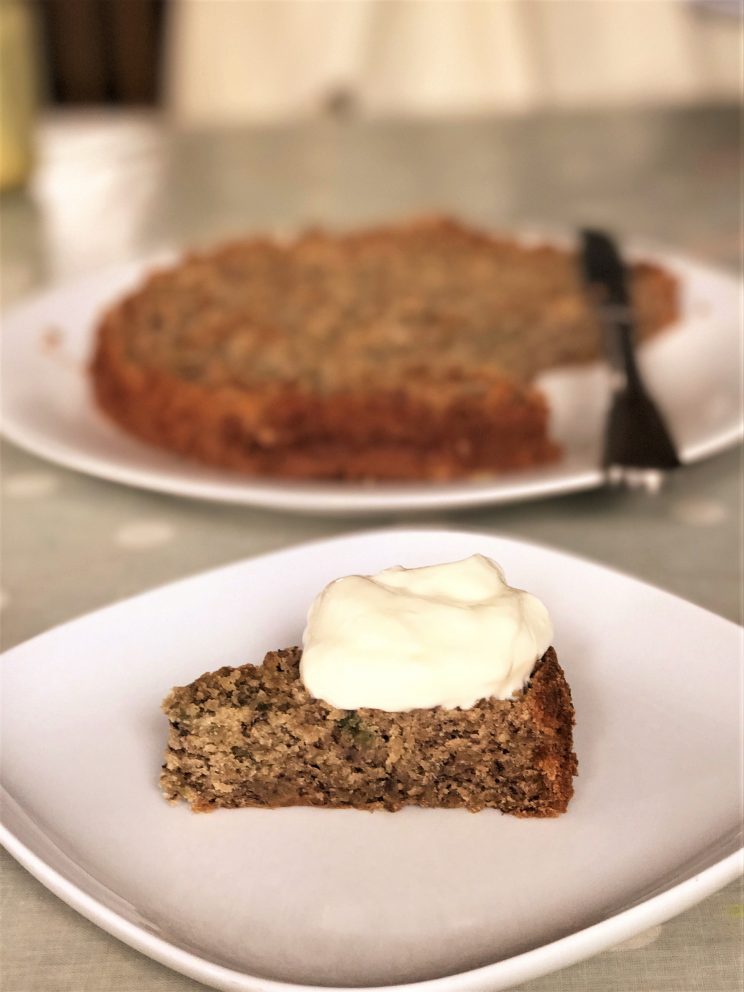
As you might be aware we are one of those “weird” families who home school. Having this amazing advantage and being able to bake we always make something new. Our usual baking story begins as always we wanted something sweet and tasty but we didn’t want just an ordinary bake. When baking there is always space for learning and Magic banana cake was a pretty awesome and delicious lesson. Now it has become one of our favourites and we had to share it with you.
Using my chemistry background and the ‘little bit’ of knowledge I gained when studying chemistry we decided to create this Magic banana cake.
So, how does it work?
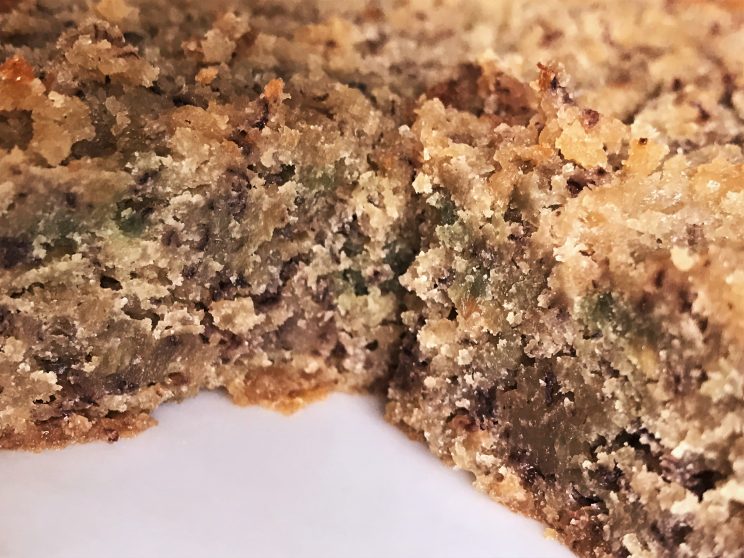
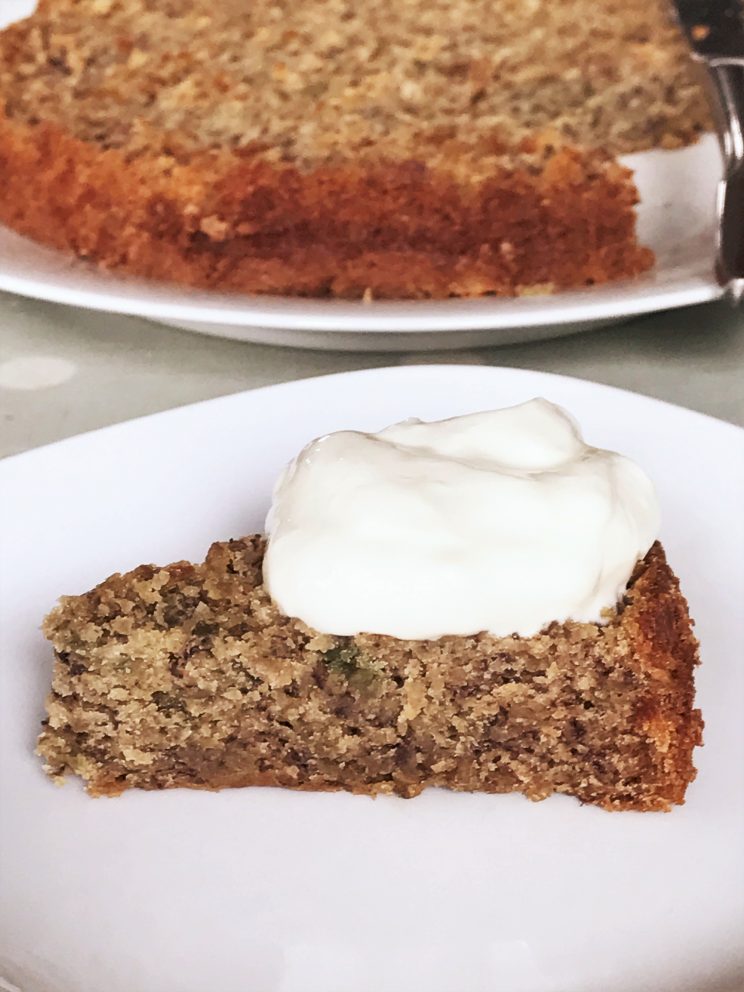
Magic banana cake is based on a simple chemical reaction between sunflower seeds that are acidic and baking soda that is alkaline. Sunflower seeds in Magic banana cakecontain chlorogenic acid which reacts with the baking agents when is heated. When cooled down the seeds turn various shades of green and turquoise. Banana on the other hand will oxidize and react to the baking temperatures and turn purple when mashed properly.
The Magic Banana cake is moist and stays fresh for quite a long time if you manage to save any. We eat is on it’s own as its absolutely delicious therefore perfect for packed lunch or a picnic. But also amazing with yoghurt, drizzled chocolate ganache, pistachio ice cream or even elaborately decorated in any cream.
Sorry about the rubbish pictures, as Magic banana cake doesn’t stay around for long. As soon I bake another one it probably will be gone as soon I open the oven.
To make it you will need:
200g butter
300g sugar
3 large organic eggs
125 ml milk mixed with 2-3 spoons of lime juice
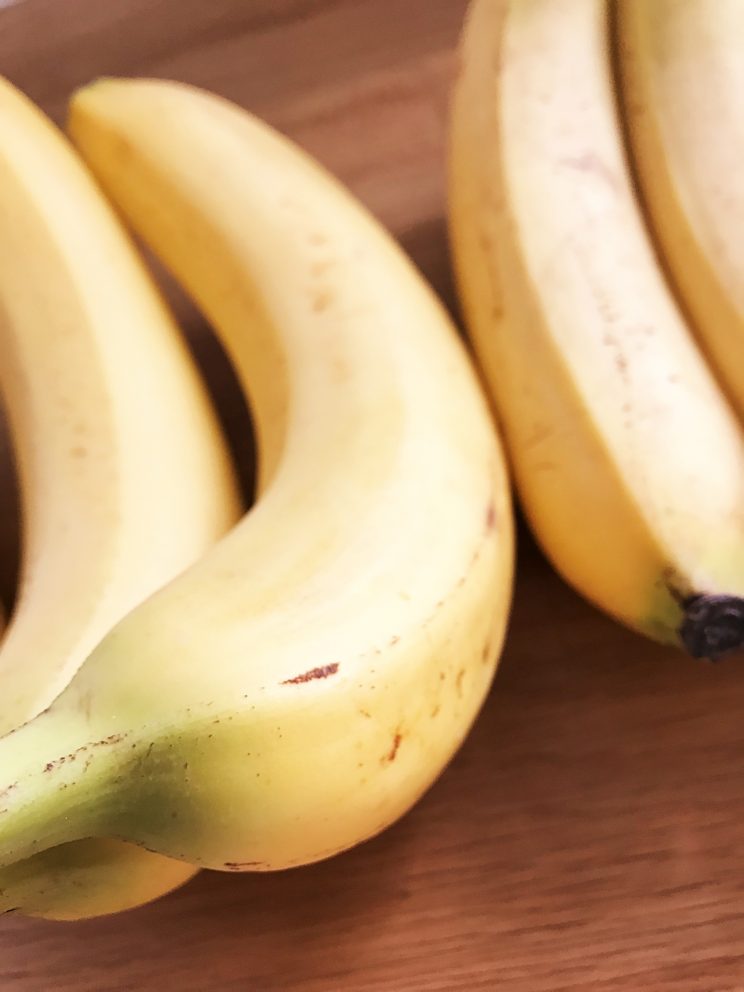
500g of ripe bananas, well mashed (the best bananas are the ones started to show brown marks)
210g plain flour
1 tsp baking powder
3/4 tsp of rock salt
2tsp of baking soda
150g sunflower seeds
Turn the oven to 155C fan. Prepare two 8″ tins, grease the sides and put baking paper at the bottom.
Cream the butter with sugar until light and fluffy. Add one egg at the time until incorporated well. Then add milk & lime mix and bananas and combine.
In a separate bowl sieve the dry ingredients and mix with sunflower seeds.
Mix it all together and split equally between both tins.
Put it in the oven for 30-35 minutes until golden brown or check with a skewer if cooked. Keep Magic banana cake in the tins for another 5 minutes and then fully cool on a rack.
I really hope you will try this recipe and experience the magic and taste yourself.
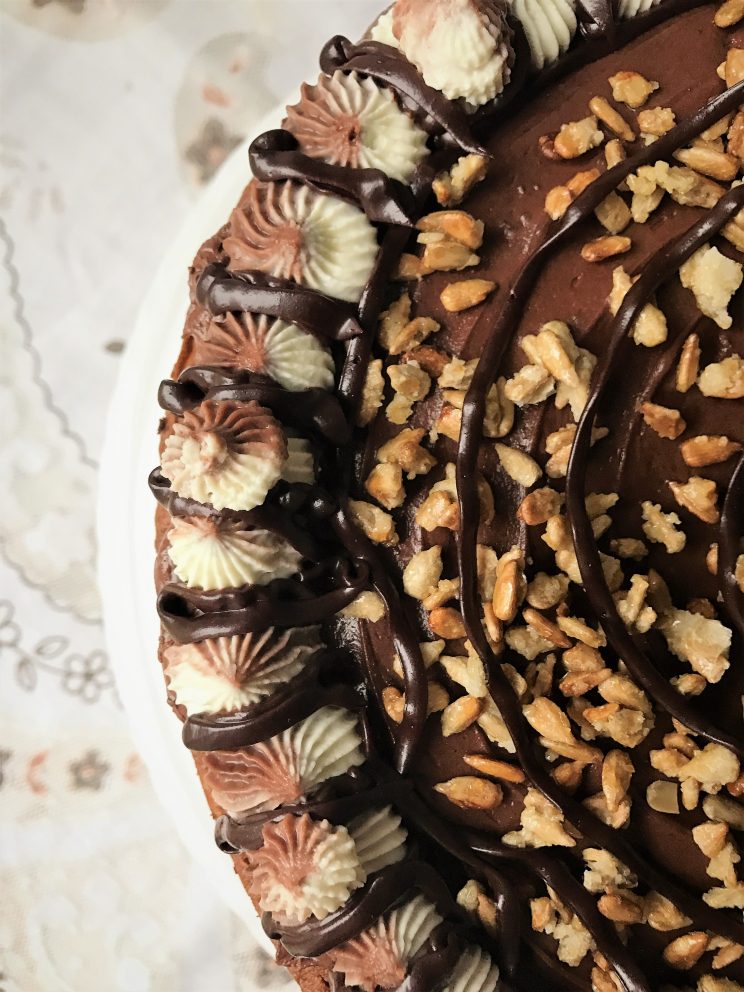
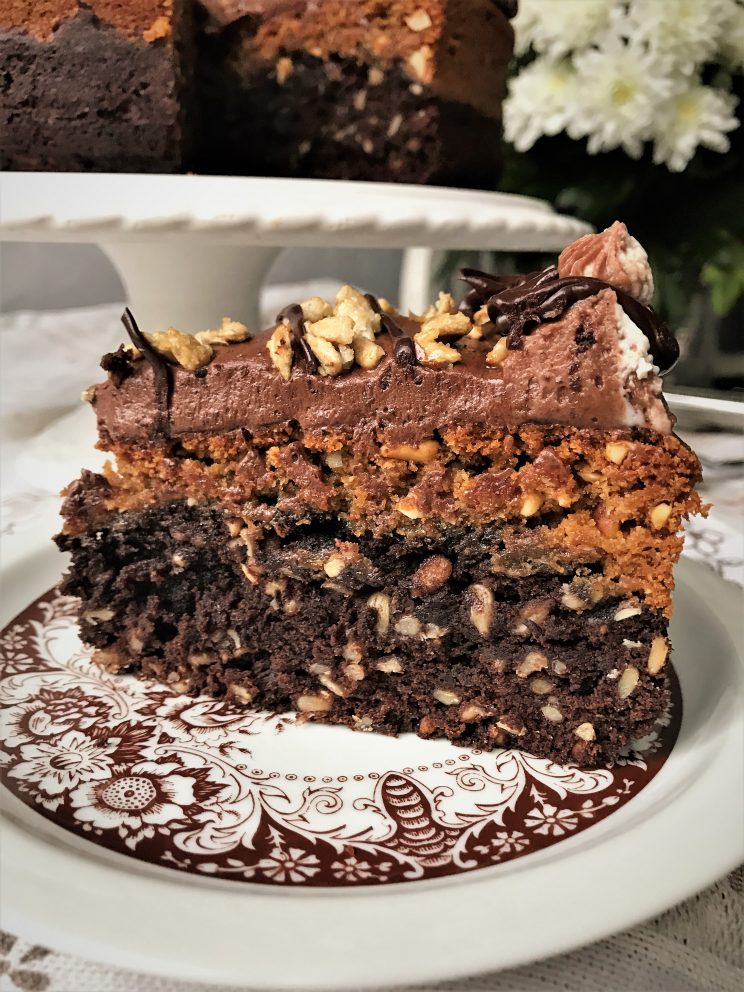
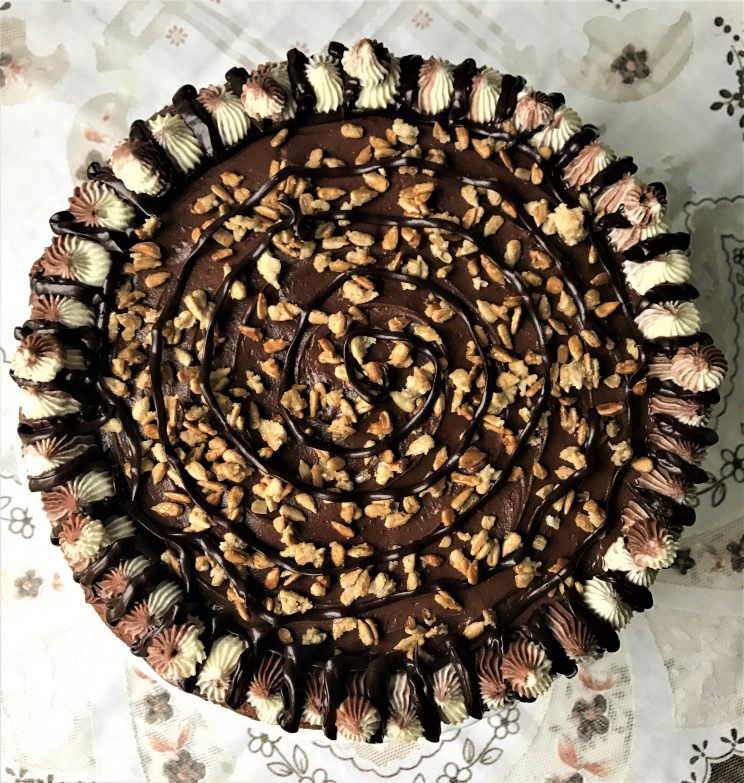
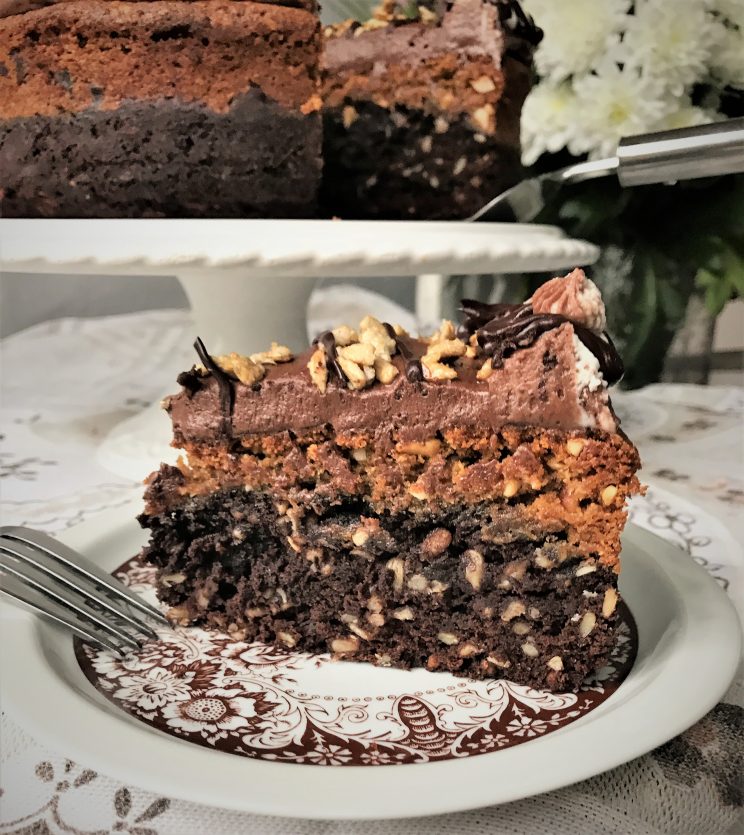
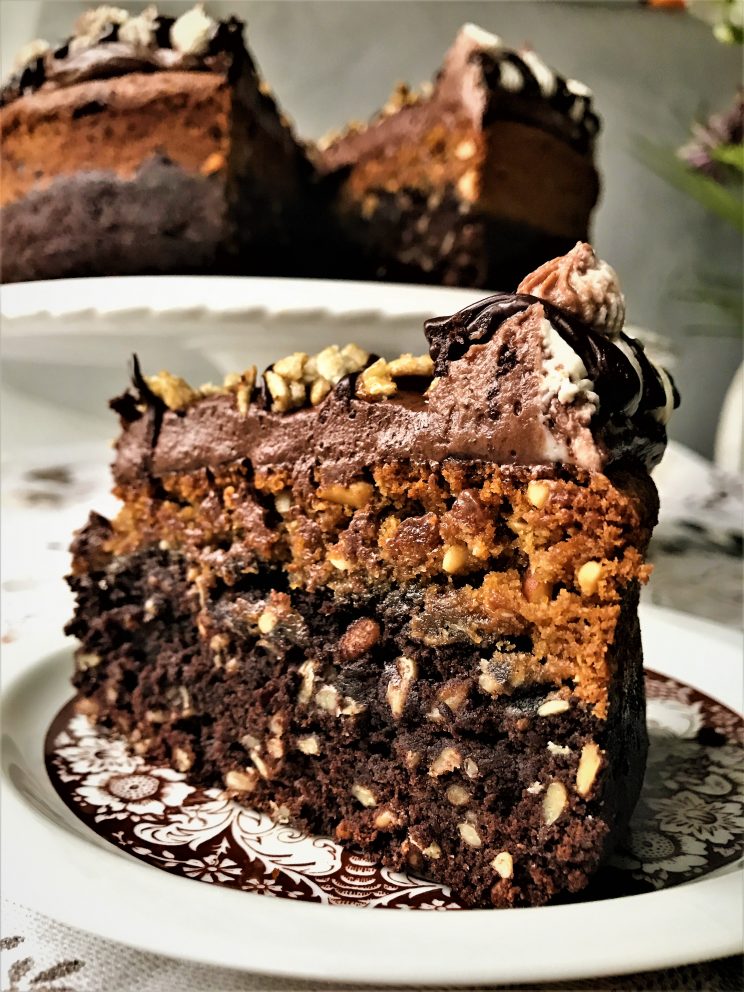
I am quite fussy when it comes to food and I don’t like walnuts in brownies but fancied creating the texture they give. One day I really wanted a sweet, nutty treat and I have decided to replace the walnuts with sunflower seeds.
When sitting and testing for the first time I had another genius moment and just spotted peanut and almond brownie laying around. Put the two together with a little bit of cream and that is how Nutty sunshine torte was made.
Nutty sunshine torte is very easy bake and you can make it in only one bowl with a couple of utensils.
It taste a little bit like cake version of Snickers bar. Chocolatey yet crunchy, full of chewy peanuts, slightly salty, topped with delicious fluffy cream.
Nutty sunshine torte a perfect afternoon tea treat or birthday cake all depending on your creativity and imagination when decorating.
Nutty sunshine torte is an easy, simple perfect brownie Snickers cake.
The recipe
For the first layer you will need:
210g white sugar
160g soft brown sugar
85g cocoa powder
150g plain flower
1/2 tsp baking powder
1/4 tsp rock salt
180g sunflower seeds
4 organic eggs*
225g melted unsalted butter
dash vanilla
*TOP TIP. If you are baking with your kids let them crack the eggs. The easiest way is to open them over a sieve in case any shells breaking in. Then simply whisk it through.
Heat the oven to 175C or 155C fan.
Sieve all the dry ingredients in to a large bowl. Add the rest and mix it with a whisk or a wooden spoon until well combined.
Line 9″ spring form with baking paper and put the mixture in the tin.
Place it in the oven and bake the first layer for 30 minutes. In the meantime prepare the peanut layer.
For peanut layer
use the same bowl and utensils and mix through after adding each ingredient:
120g crunchy peanut butter
40g of peeled and roughly chopped monkey nuts
70g melted unsalted butter
130g white sugar
100g soft brown sugar
2 organic eggs
dash of vanilla
110g ground almonds
1 tsp baking powder
1/4 tsp of rock salt
After baking the first layer for 30 min take it out the oven carefully. Try to complete the next step quickly.
Very gently top the the peanut butter mix on to brownie layer. Bake for additional 30-40 minutes at the same temperature until golden brown. Leave to cool.
The cream
90g unsalted butter
45g cocoa powder
2 tbsp golden syrup
dash vanilla
250g icing sugar
2 to 4 tbsp milk
Put all in a mixer and slowly work to a paste then beat on high speed for a few minutes to light and fluffy.
Spread on the cake and decorate as you wish.
I decorated mine with some toasted in sugar sunflower seeds, mascarpone and some dark chocolate sauce.
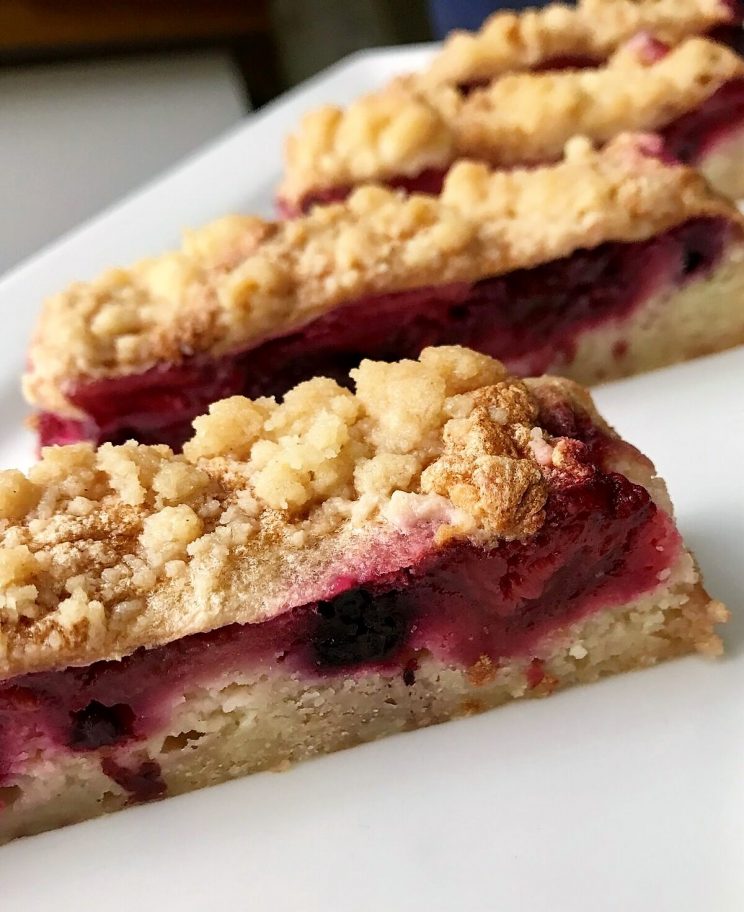
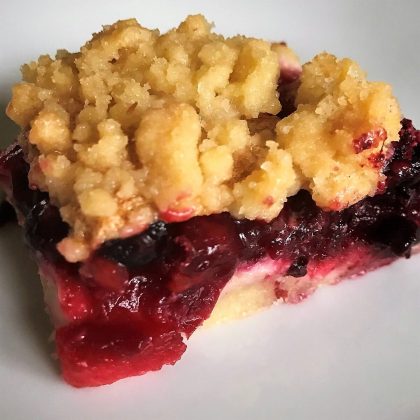
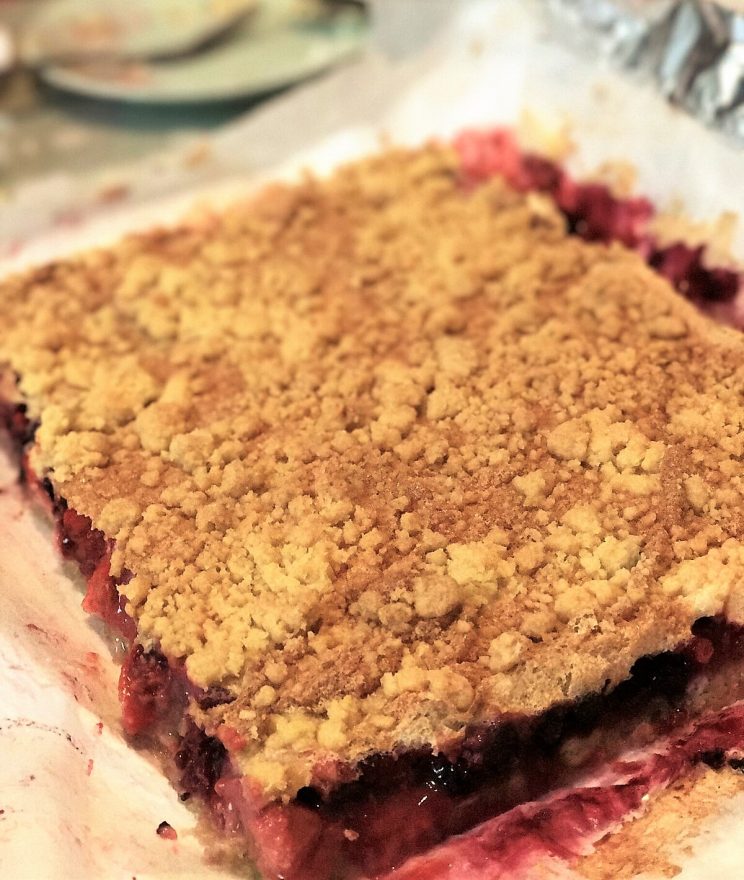
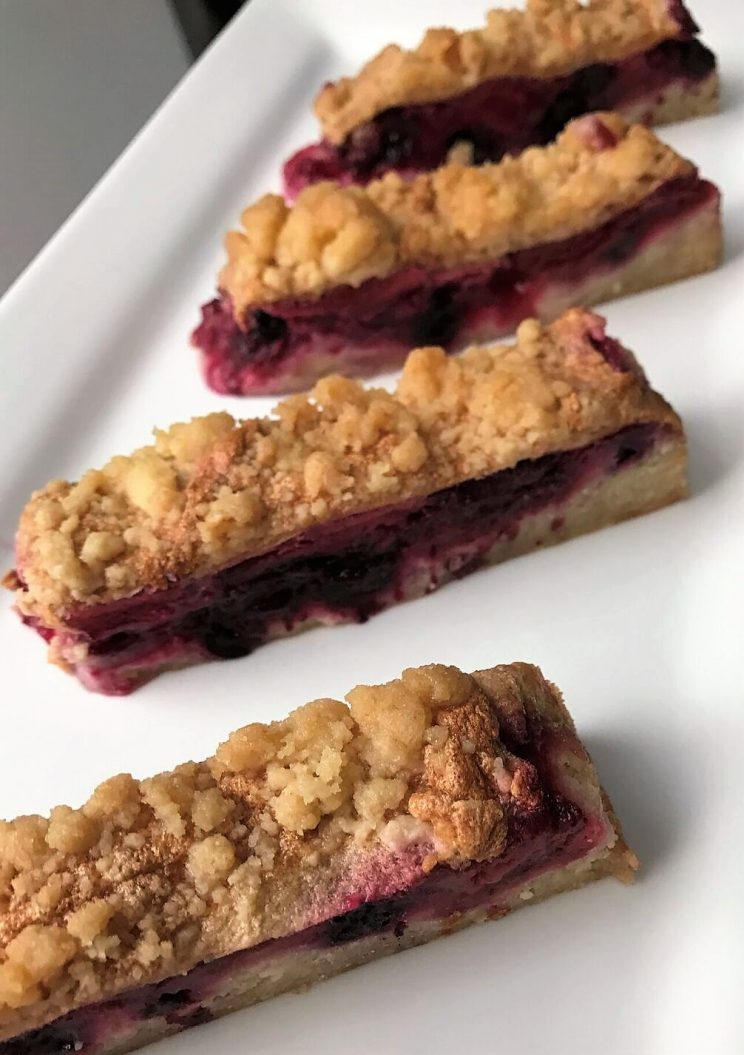
Last summer we spend an amazing few weeks in Poland. The weather was outstanding, almost every day over 30C and the gorgeous weather meant there was plenty of juicy and delicious fruits to be picked.
Originally Very berry cookie dough cake was my mums recipe that she made over and over again for us when we visited. She made it with apples and cherries but we adapted it slightly and came up with this Very berry cookie dough cake version.
The Very berry cookie dough cake is a fresh, quick and easy reminder of those long hot summery days. It taste perfect when eaten warm with ice cream or cold even on its own!
The base.
For the Very berry cookie dough cake base you will need:
400g plain flour
4 organic egg yolks
200g sugar
250g cold, unsalted butter
dash of vanilla
2 tsp baking powder
Sieve the flour. Chop the butter in to small cubes and place all the of the ingredients in a food processor. If you haven’t got a food processor you can ‘rub’ it with your fingers. It suppose to make a loose crumble like texture. Put a side.
Meringue.
In the meantime prepare:
4 egg whites
pinch of salt
100g brown sugar
Whisk the egg whites with salt until stiff. Slowly add sugar and set aside.
Fruit mix.
You will need :
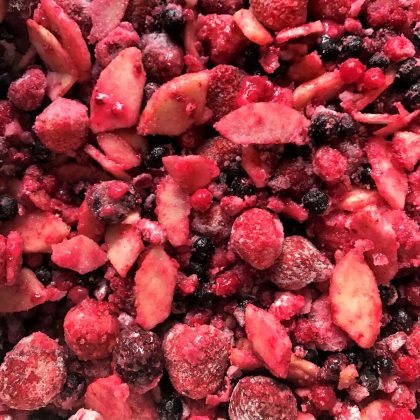
1200g – 1500g fresh or frozen mix berries*
4-5 tbls of corn flour depending on type of fruit you use
couple of spoons of sugar to your taste*
*I have used frozen mix of summer berries (red currants, black currants, strawberries and raspberries) with some extra frozen strawberries which allowed me to skip the sugar. We prefer our fruit to be slightly sour in taste especially when the cake and meringue are quite sweet. I have also added two crunchy apples, chopped to small pieces for the texture but again you can leave it out.
Mix the fruit with corn flour (and sugar) so it is coated evenly.
Warm the oven to 180C or 160C fan.
TOP TIP. First line a 10″ baking tin with tin foil making sure it overhangs the tin (this is to help to remove the cake later). Then using one, large piece of baking paper place it on top and press it into the corners again making sure it overhangs slightly.
Assembling the layers for Very berry cookie dough cake.
Depending if you are using fresh or frozen fruit please follow step 1 or step 2!
Fresh fruitbaking.
Sprinkle evenly 3/4 of the crumble mix in the baking tin. Gently cover with the fruit and then spread the meringue. Crumble the remaining mix on the top.
Bake for 45-50 minutes till golden brown.
Frozen fruitbaking.
Sprinkle evenly 3/4 of the crumble mix in the baking tin. Gently cover with the fruit and place it in the oven. Bake it for 25 minutes. Take it out and quickly top it up with the meringue and crumble the remaining mix on the top.
Bake it for 50-60 minutes till golden brown.
You can enjoy a slice or two straight from the oven but cool completely before removing from the tin.
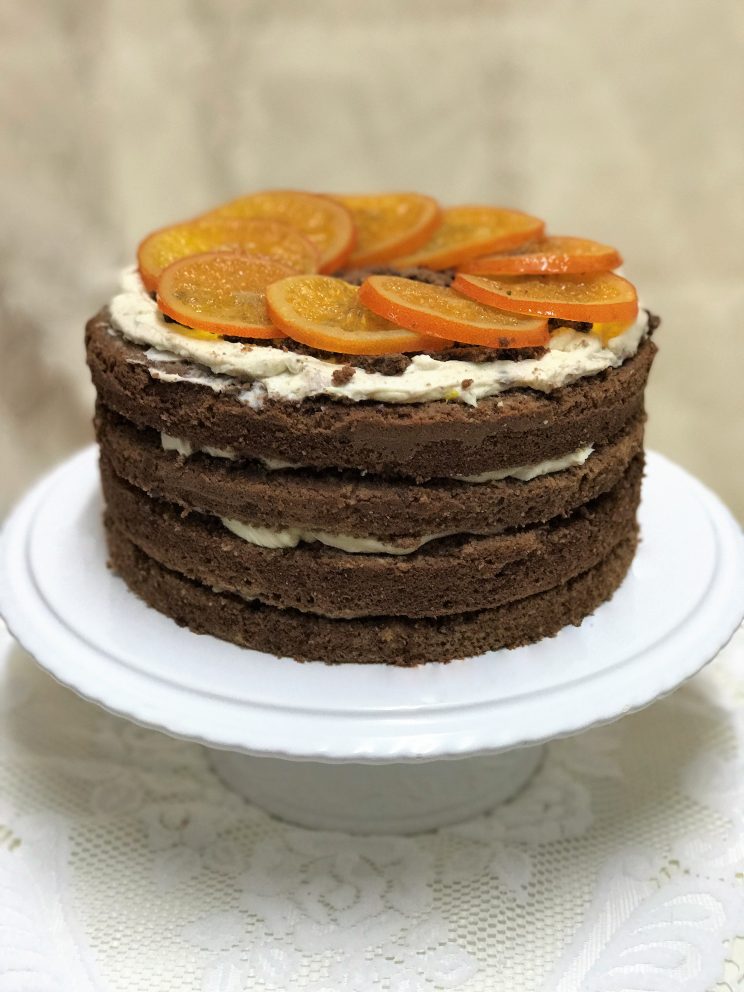
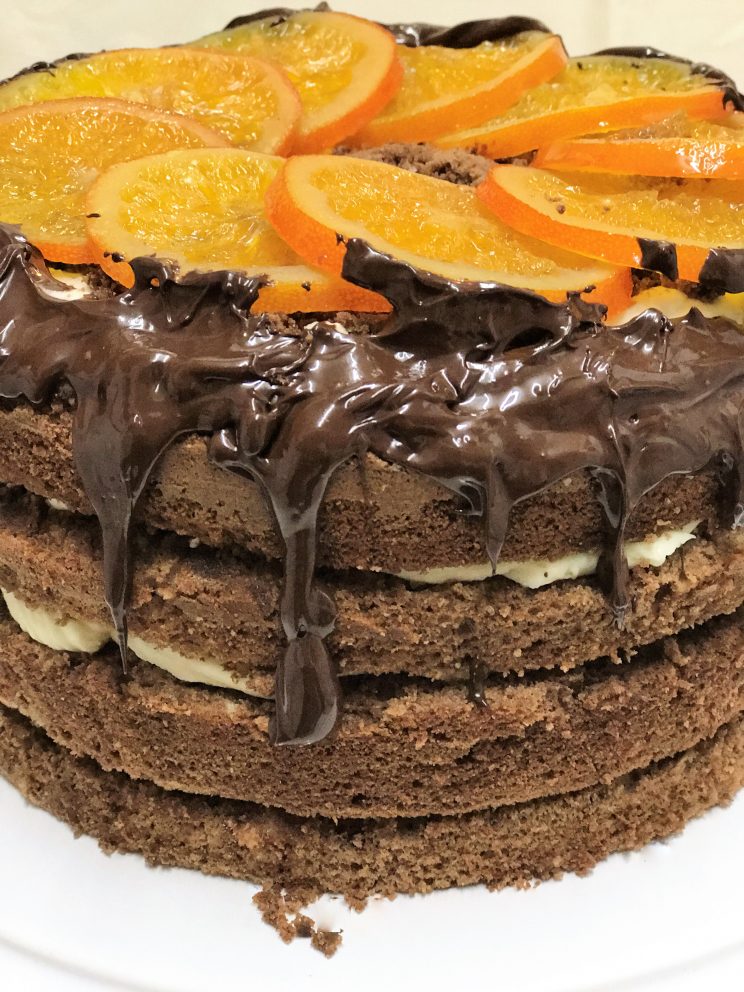
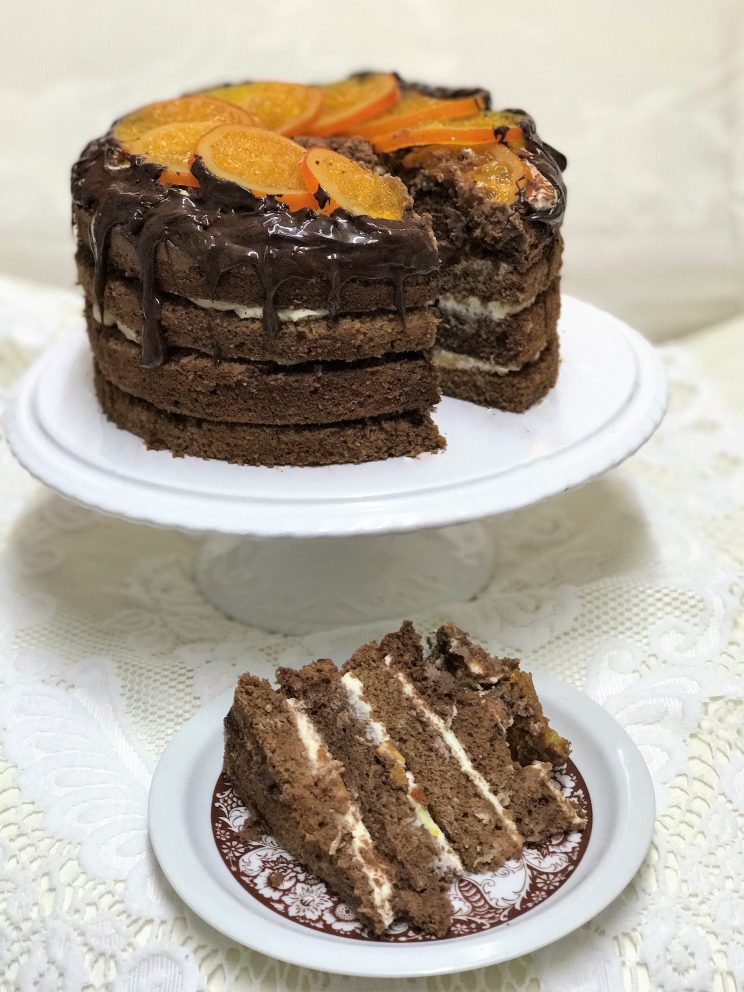
Slow almost lazy you would say Saturday at home. I felt like baking something light and naughty. Usually we are ending up with our favourite chocolate brownie cake but this time it didn’t feel quite right… so I came up with this amazing “Aggy’s chocolate orange gateau”.
It can be as easy as you like or you can decorate it with elaborate sugar work.
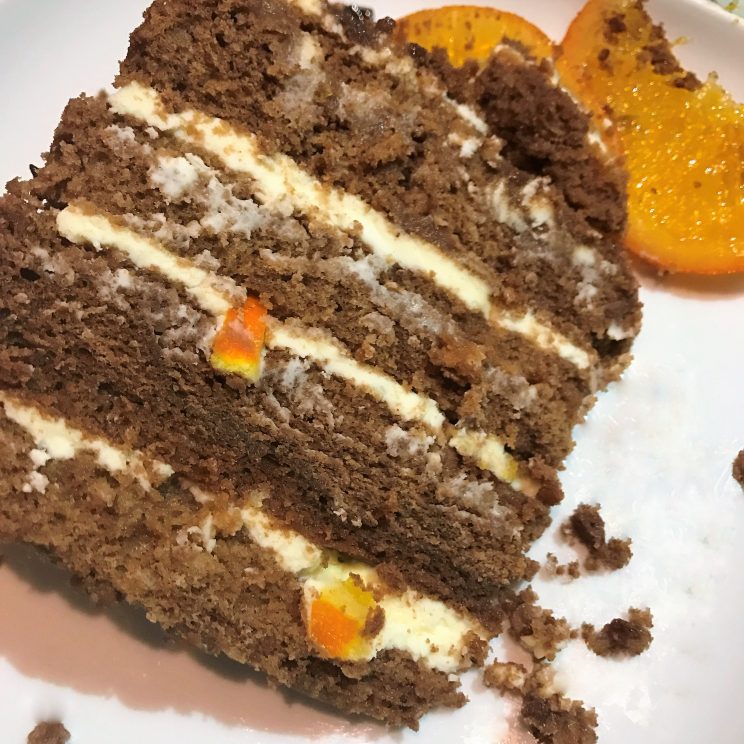
Aggy’s chocolate orange gateau is a slightly chocolaty, light and moist sponge with delicate creamy orange after taste. Almost like a cake version of the famous orange chocolates.
For the Aggy’s chocolate orange gateau cake prepare:
280g caster sugar
8 organic eggs (room temperature)
200ml water
200g dark chocolate (I have used 60% cocoa but you can use higher if you wish)
280g plain flour
dash of vanilla
1tsp of baking powder
Whisk sugar and eggs on high speed until almost white.
In the meantime boil the water and let it cool down slightly. Smash the chocolate into small pieces. Use a plastic bowl preferably and slowly mix the water into the chocolate until combined and smooth.
Sieve and mix the flour and baking powder. Fold it in slowly simultaneously with melted chocolate in to the egg mixture in few portions.
Prepare two 8” tins. Do not grease the tins! Instead only use paper circles for the base.
Split the mixture evenly and bake it at 160C fan for around 55 minutes. If unsure check with a skewer.
When ready take out the oven and cool in the tin for 15 minutes. Then cut around the sides, turn up side down and remove the paper. Turn the right way up on a rack and leave to completely cool.
Cut both cakes in half.
TOP TIP. The easiest way to cut neatly and accurate that works every time! Mark around your cake lightly with a sharp knife. Take about two foot long piece of dental floss and wrap around the cake. Cross the floss at the front and gently pull through until it comes out the cake.
Filling.
750g mascarpone cheese
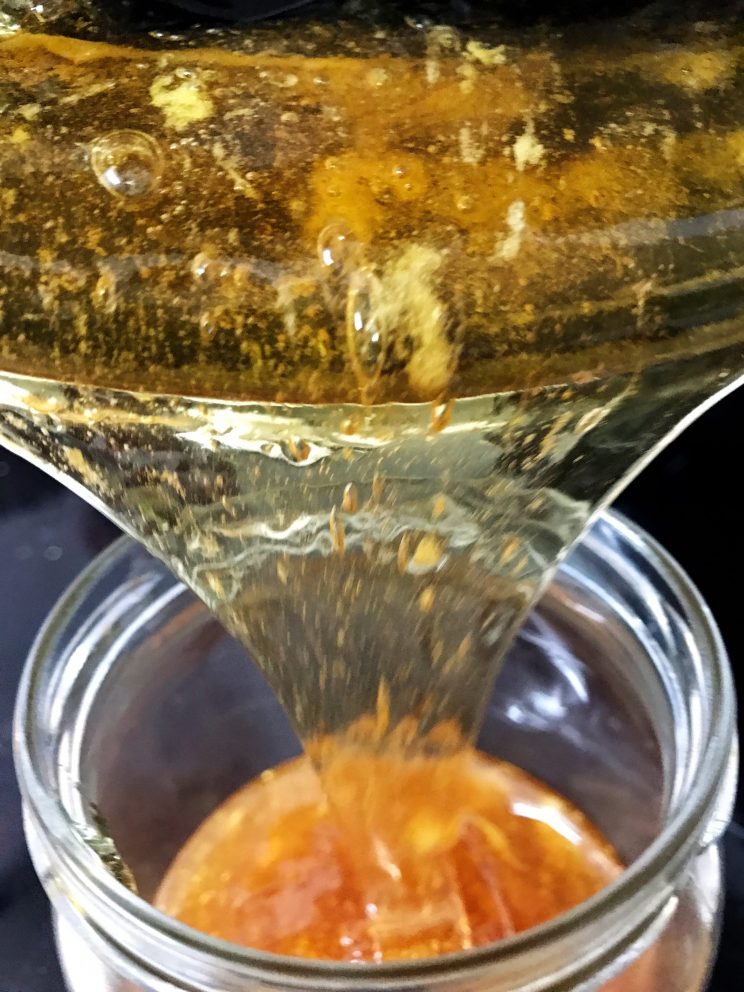
high quality organic orange marmalade (I have made my own, if you’re brave enough give it a go keep an eye out for the recipe in one of the upcoming posts)
Add to taste, mix it trough.
Assembling Aggy’s chocolate orange gateau.
Additionally you will need
juice from 2 organic oranges
Drizzle each cake with some orange juice and sandwich with the cream. Decorate as you wish.
Being a cake designer is a busy life and one where ultimately the customer has the final say on the look of the cake.
But, when given the opportunity to have totally free rain over a project I can take the ideas to another level. I very rarely get the chance to make something that I think of myself without consulting the customer. So I thought why not see what can be done within 24 hours or less in this case.
I didn’t have to think long! Who is the most famous ghost of all…?
You got it!
SLIMER!!
One of my favourite characters from the amazing 80’s movie Ghostbusters.
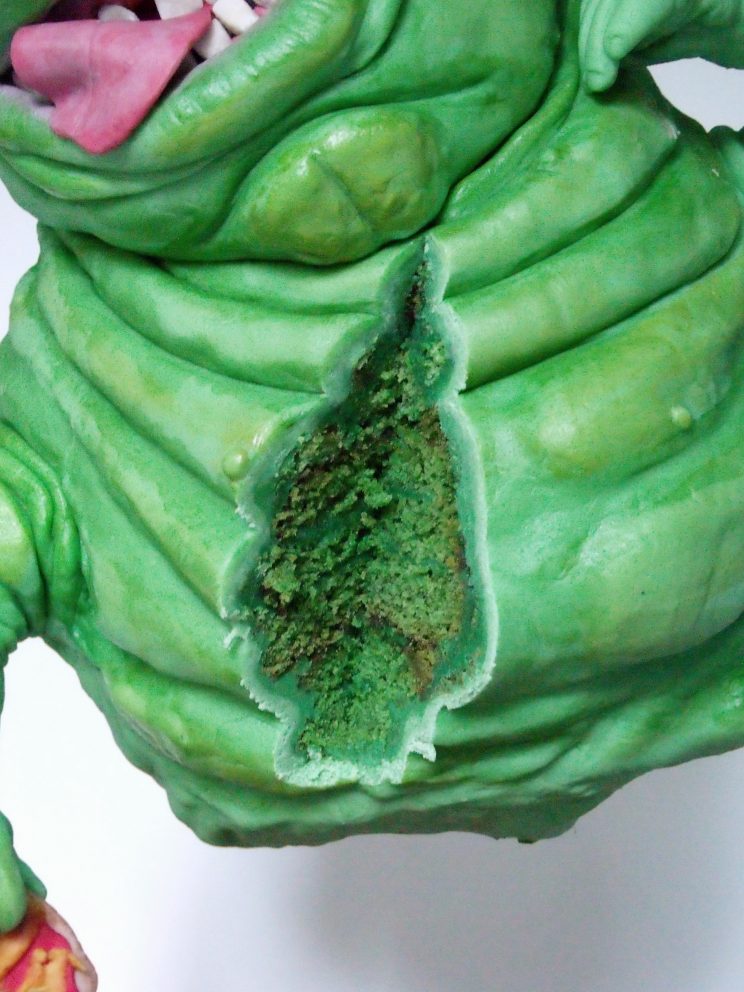
As he is obviously a ghost the challenge was to make him as gravity defying and “floaty” as possible. I decided to make him stealing one of his favourite things, slice of pizza!
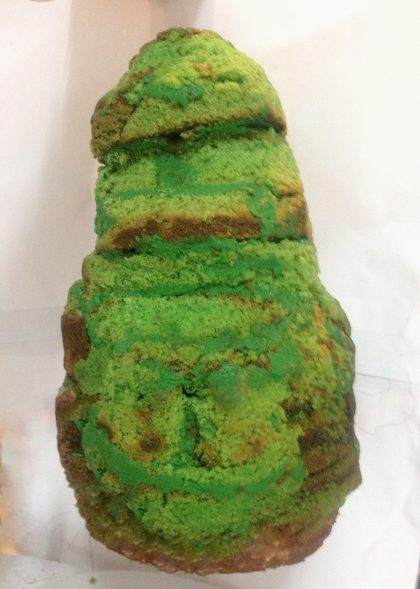
We had to start somewhere so I did a quick sketch of the stand and showed it to Andy. Within a minute we have agreed the theory and started with the process. I got on with the baking delicious green white chocolate cake to match Slimer’s rather green appearance.
Andy disappeared into his workshop and after a lot of sawing, bending, cutting and screwing he emerged with a fully built stand.
Meanwhile the ganache filling was finished and also very green!
Sculpting time
One of the most important parts when sculpting is shaping the cake… And is also one of my favourites, because who doesn’t love a break with a cup of green tea and some (very green!) off cuts!
He was just a simple, straight forward shape. Almost like a giant green potato except all the fat rolls.
I know I know, you might be thinking I could of just added the fat rolls made out of fondant later. This would be quicker and easier but honestly who would want to munch on a huge piece of sugar paste.
Andy is the kneading machine and in a couple of minutes all the sculpting paste was green. Covering was very easy and I must admit I did enjoy shaping all those fatty bits.
As for his face I wanted Slimer to look sneaky and I just love his cheeky smile. I hope I have managed to achieved it.
Slimer traveled with us to one of London’s TV studios for an exclusive Halloween party and has been demolished in minutes.
In total this cake took us 8h of work. It is cakes like this that really keep my passion for it alive!
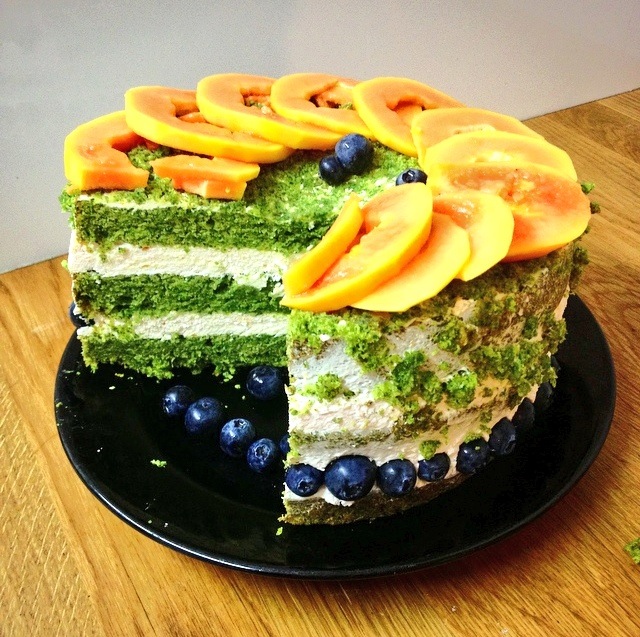
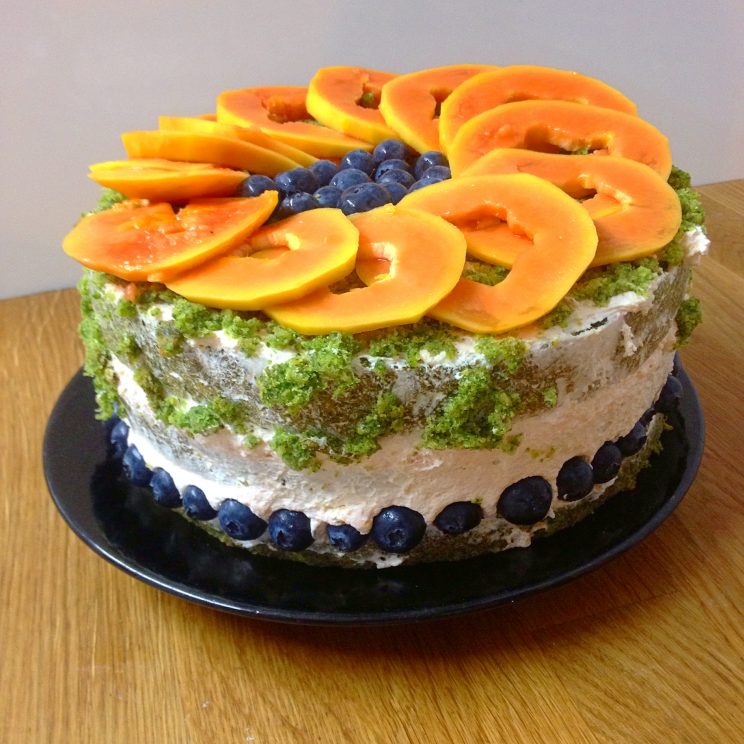
Halloween Moss cake… Spinach and a cup of tea…….?!
No, really!
Halloween Moss cake with spinach may sound like a crazy idea but trust me and try this delicious cake with natural colouring.
I remembered this Halloween Moss cake recipe recently while thinking about how to change the artificial edible dyes full of chemicals. But there will be more about this in a future blog post. I wanted a healthy, natural and friendly mix that won’t send little people a bit crazy sometimes. What better time than around Halloween when they are allowed that little bit extra?
I got a basic recipe from a friend years ago and I was just as sceptical as you probably are right now. But trust me you will be surprised how tasty it is and how well it works with an afternoon cup of tea!
I adapted it to make it more ‘halloweeny’ (if that’s even a word) and made it easy and fun for the kids. They can get involved in the making and decorating as well.
Now, you are probably wondering about the flavours and especially how the spinach works. So the cake is nice and moist with no taste of spinach but almost like a shadow of green tea and works amazingly well with the fluffy orange filling. It’s topped perfectly with little bursts of fresh blueberries and sweet fruity, flowery nectar like sweet papaya.
This recipe is perfect to fill an 8” (24cm) round tin.
Recipe
To make it you will need:
For the cake
600g when frozen spinach, set aside and allow to defrost
4 large eggs
280g of fine sugar
250g margarine, melt in the microwave, leave to cool
450g plain flour, sieve, mix with baking powder
3,5 tsp baking powder
1 tbs vanilla essence
Cream
400ml double cream
1 hipped tsp of powder sugar
1 orange powder jelly sachet
200ml fresh orange juice or water
Additionally
box of blueberries
ripen papaya
Heat the over to 165C fan or 180 without (350F).
Line the sides and bottom of the tin with baking paper.
Whip sugar and eggs till white.
Squeeze very well liquid out of the defrosted spinach and blend to puree with a little bit of melted margarine. When ready add the remaining margarine and mix together.
In the meantime on slow speed on your mixer add flour combined baking powder to the eggs and sugar mix. Incorporate well but be careful not to over stir it.
Add the blended spinach. Fold it in.
Put it in the tin, smooth over and place in the oven for 55min. Check with a skewer if cooked if not allow some additional time.
The filling. Dissolve the jelly either in fresh orange juice or water as per sachet instructions. Set aside to cool. When the jelly starts thickening whip the cream to soft peak. Mix in the jelly.
Fully cool down the cake and slice across through twice so you end up with 3 pieces.
Fill in with the cream and decorate with fresh fruit as you wish.
We had two totally different designs to finish and deliver on the same day.
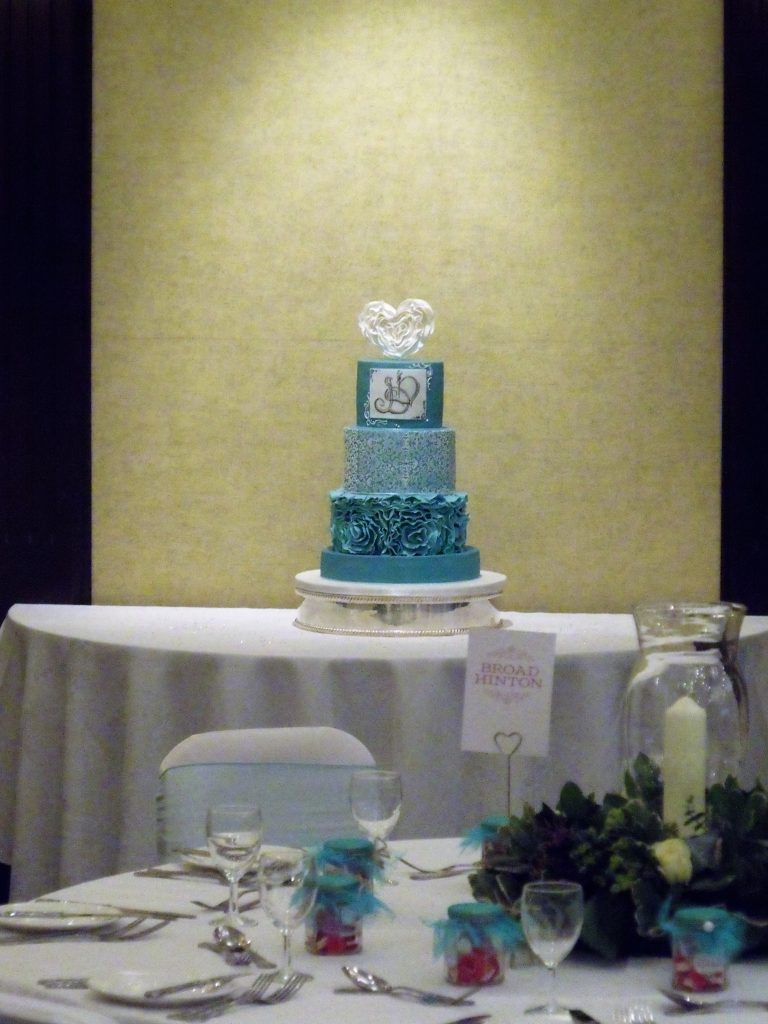
It proved a good test of time keeping and being able to switch from one to the other. One second we are covering a four tier wedding cake. The next we are piping royal icing onto an edible shoe!
We had a beautiful four tier wedding cake to be done. The guide we had was to match the colour of the wedding and include some frills. So we sat down and got drawing changing the design probably 7- 8 times before we finally decided on a final look.The hardest part was to match the theme colour. It was a deep shade of teal.
A last minute stroke of genius saw Aggy draw an entwined painting of the couples initials and even incorporated a heart into it to really finish off the second tier.
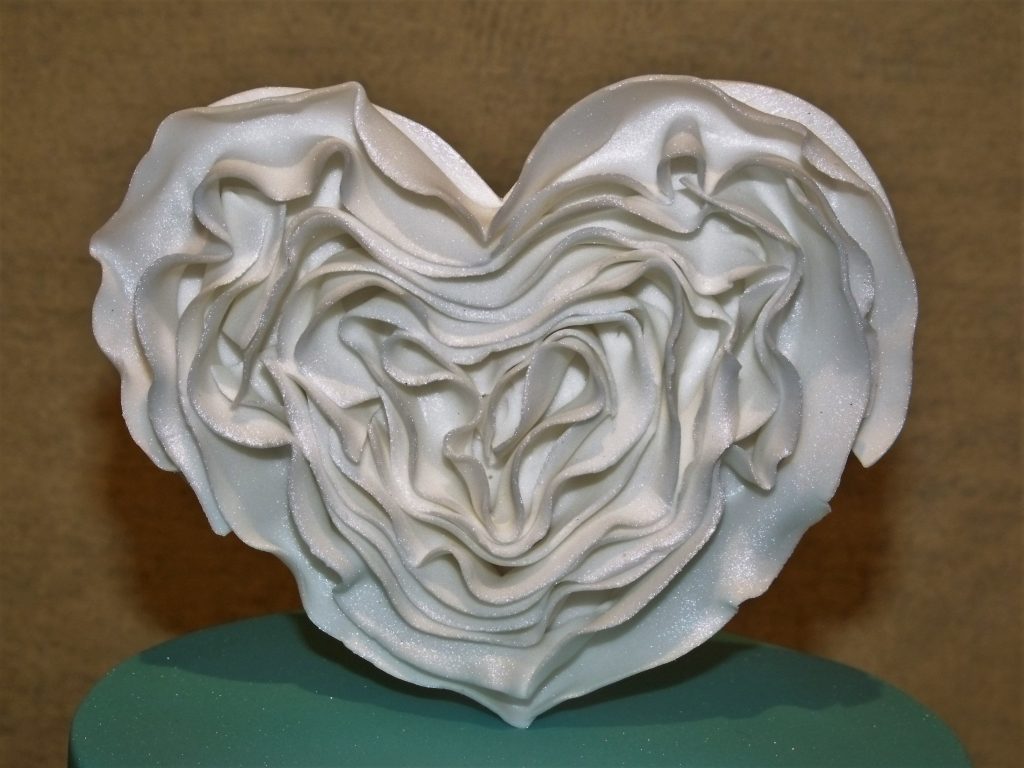
The heart on top to be the last piece of the puzzle and we think it all fits together perfectly, to create a beautiful elegant wedding cake that fits into the decoration of the venue.
The second cake was an amazing challenge. We needed to make a copy of the birthday lady’s favorite pair of shoes by Jimmy Choo. The set included a cake shoe box, beautiful red rose and of course an edible copy of the shoe itself.
The board was made to look like cobble street which really set the whole cake off perfectly!
The shoe box was our gorgeous dark chocolate brownie cake and chocolate ganache. Stunning blend for the most indulgent of chocolate lovers!
Both cakes were delivered on the same day and really tested our smooth driving skills around the Cotswolds!
TOP TIP. To really make your rose come to life you can airbrush the center of it. Simply spray with a slightly darker shade of red or dust it with edible powder.
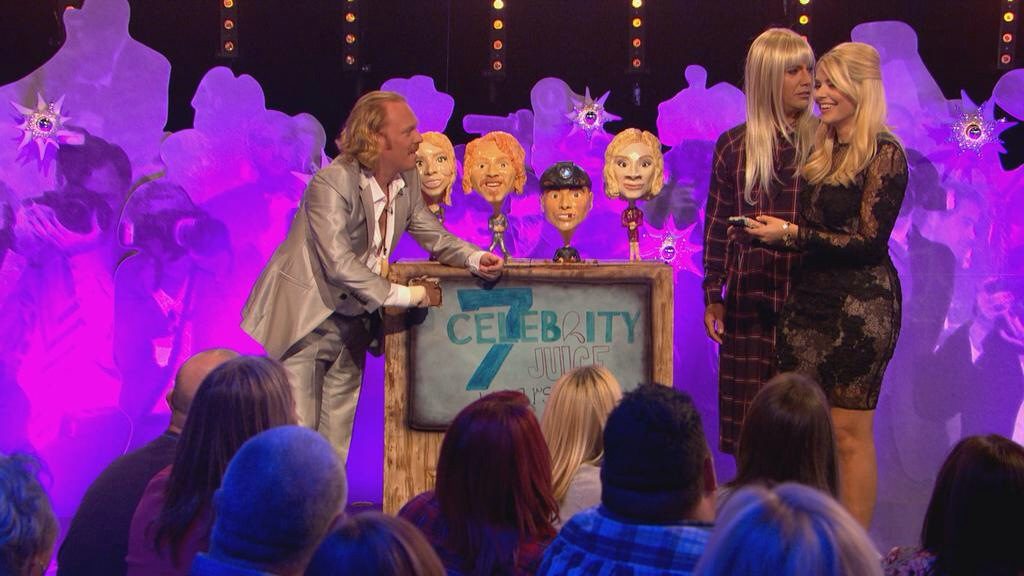
80’s TV 7th birthday cake for Celebrity Juice Keith Lemon ITV2 Part 2
Arriving at the Celebrity Juice studio.
When set off for London all we had in our minds was “please don’t slide in the boot”! Every bump and noise from the car had us worried as we drove on. It was a two hours’, shaky drive to get to the Celebrity Juice studio. It made it even more difficult for Aggy and Beccy holding the caricatures, while Andy did his best to miss the pot holes.
When pulled up to the studio it dawned on us that we still need to get this cake out again. After some frantic running around we managed to find the correct studio and went to find help. Six ‘Celebrity Juice’ team members come out rather nervous, as they had no idea what is was going to look like. As I opened the back of the van we all breathed a huge sigh of relief.
It still was all in one piece!
As we all crowed around it to lift it out more and more people came to have a look. This only added to the pressure but with a gentle push and a wiggle 250kg of cake was on the trolley and ready to finish in the studio. As we made the long (about 25m, but felt like 4 miles) journey to the studio we could hear Keith’s voice from inside. We had two reroutes on the way because of cables and other obstacles. The cake sliding nearly dropping off the trolley at one point but we had it back stage and could start the final assembly.
Last finishing touches to the Celebrity Juice cake.
While we were working like mad to finish it, we could see Keith Lemon setting up the show and we were constantly laughing. While putting the ribbons on and painting the inside of Fearne’s nostrils we noticed Keith was stood next to us open mouthed. A bit shocked we shook hands and starting chatting cake. He loved the heads and asked if he could keep his after filming. Who are we to say ‘NO’ to Keith Lemon!!!! As we are chatting away with him we had to demonstrate where to start cutting. The way it was made you could cut straight from the top of the TV to the bottom of the screen.
The only thing nobody had a knife!
After a good long chat he had to run off to get ready for filming and with the cake nearly done we started breathing again.
Just before filming last little push around the studio to move the cake across to the other side of the stage. As we pushed it across we got nice OOOOO’s and AHHHHH’s from the audience.
A last lift to the stage!
We finally sat down!
The filming began.
The next four hours were a blur of constant laughter, watching the filming and how the show is made. How Keith Lemon has so much energy is a mystery he is always doing something hilarious.
After the filming, the warm up guy invited us to the after party, we were buzzing! We went back stage again with the ‘heads’ to give to their new owners.
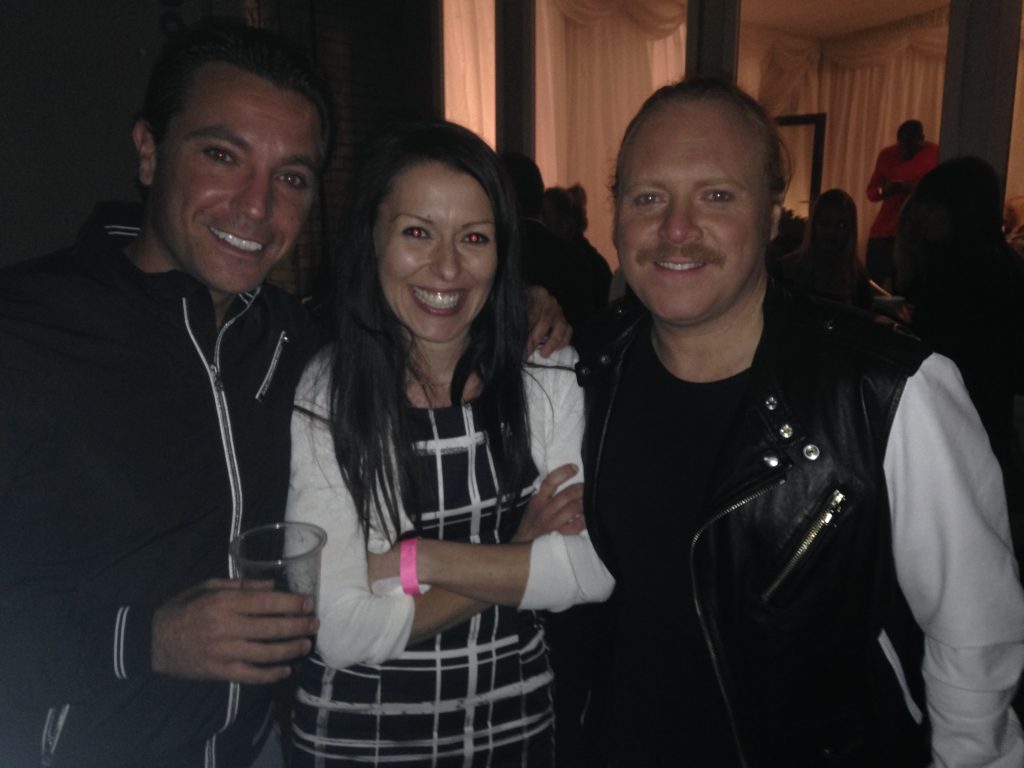
While chatting to Chris Moyles, Tulisa, the film crew and guests we saw Leigh Francis and Gino appeared. We got talking to them, a real ‘pinch yourself’ moment but they were very cool and funny.
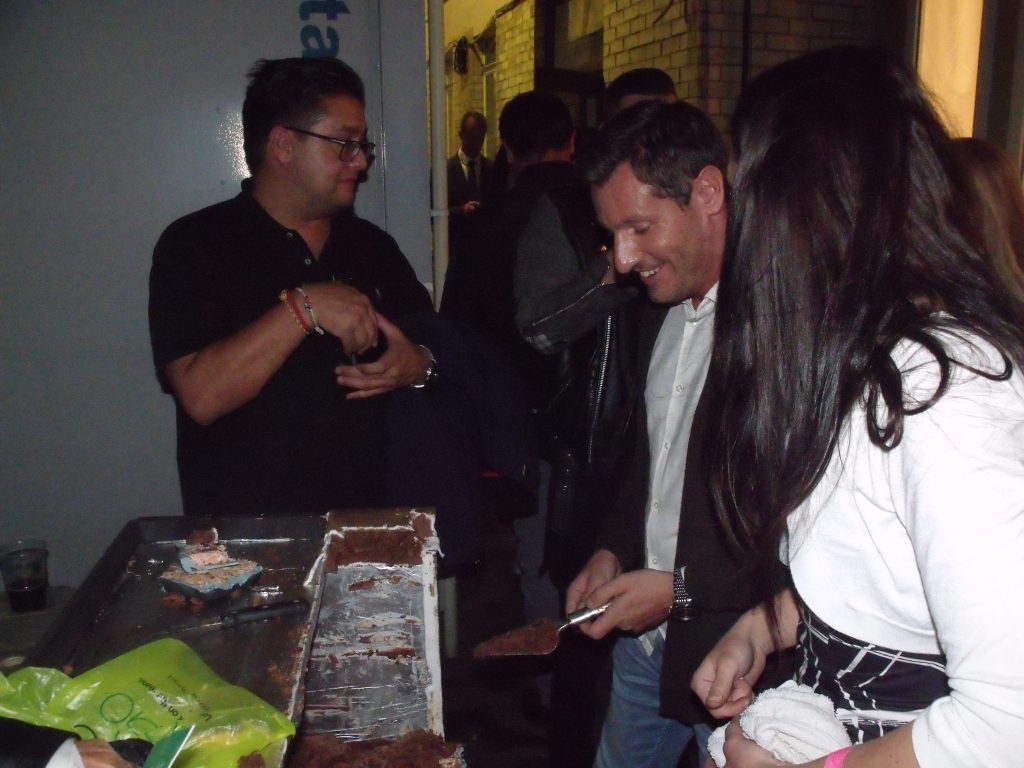
While chatting we remembered we still had quite a lot of cake left, so we ran into the studio and wheeled it outside for everyone. As we were talking to the guests, Dean Gaffney walked over and started digging in..
The rest of the night was filled with chats with as many people as we could. The reception of the cake and heads was awesome, and we were treated like celebs ourselves by the crew and guests.
It really was an incredible evening and finally all the hard work was over and we could have a laugh.
Was all the work worth it?
Of course! And we would do it all again tomorrow if we could. Maybe a bit of sleep first.
As we thanked everyone and said ‘bye’ we looked around and realized we still had to load the car. Then drive two more hours to get home.
There is no rest for the wicked!
They say you should never meet your heroes but we are so glad we did and hope to party with them again soon!!!
80’s TV set for Celebrity Juice, ITV2 and Keith Lemon.
Last week we were rather busy. We had a great pleasure to make an 80’s TV set cake for ‘Celebrity Juice’. The well-known TV comedy show from ITV2 presented by Leigh Francis aka Keith Lemon. (more…)


 One day I had a brain wave and wanted to make a savoury cake. Can you see where I am going here? {That’s how savoury Goat cheese cake was made.}
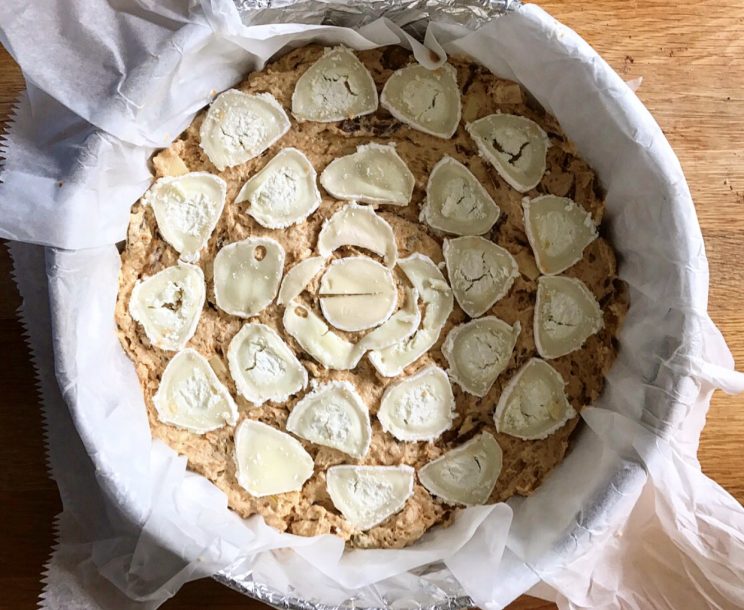


 The hardest part was to match the theme colour. It was a deep shade of teal.
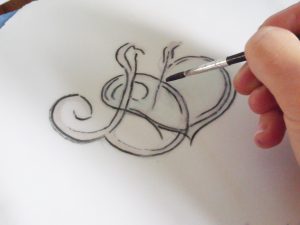


 While we were working like mad to finish it, we could see Keith Lemon setting up the show and we were constantly laughing. While putting the ribbons on and painting the inside of Fearne’s nostrils we noticed Keith was stood next to us open mouthed. A bit shocked we shook hands and starting chatting cake. He loved the heads and asked if he could keep his after filming. Who are we to say ‘NO’ to Keith Lemon!!!! As we are chatting away with him we had to demonstrate where to start cutting. The way it was made you could cut straight from the top of the TV to the bottom of the screen.